Prospecting is the lifeblood of any business.
Yet how many startups and SMEs launch their business without a real prospecting plan?
Because, yes, prospecting needs to be planned, organized and part of a real strategy.
In this article, we’ll look at how to structure a prospecting plan from A to Z. Whether you have a team of one salesperson or dozens, this guide will give you the tools you need to build an efficient, scalable prospecting machine.
Gone are the days when you’d shoot at random and hope to hit your target.
By following these 6 steps to build your prospecting plan, you’ll be able to implement a prospecting strategy that converts, measures and continually improves.
Ready to build a solid lead machine?
Let’s get started!
Sommaire
Step 1: Define your prospecting objectives
Before diving headlong into prospecting, take the time to clearly define your objectives.
This is the basis of any effective prospecting plan.
Without clear objectives, you run the risk of sailing blindly, wasting time and resources.
Set goals using the SMART method
Your prospecting objectives must be SMART, i.e. :
Specific, Measurable, Attainable, Realisticand Temporallydefined.
Forget vague intentions like “I want more customers”.
Instead, aim for concrete objectives such as “To obtain 20 qualified appointments per month with decision-makers from SMEs in the tech sector over the next 3 months”. 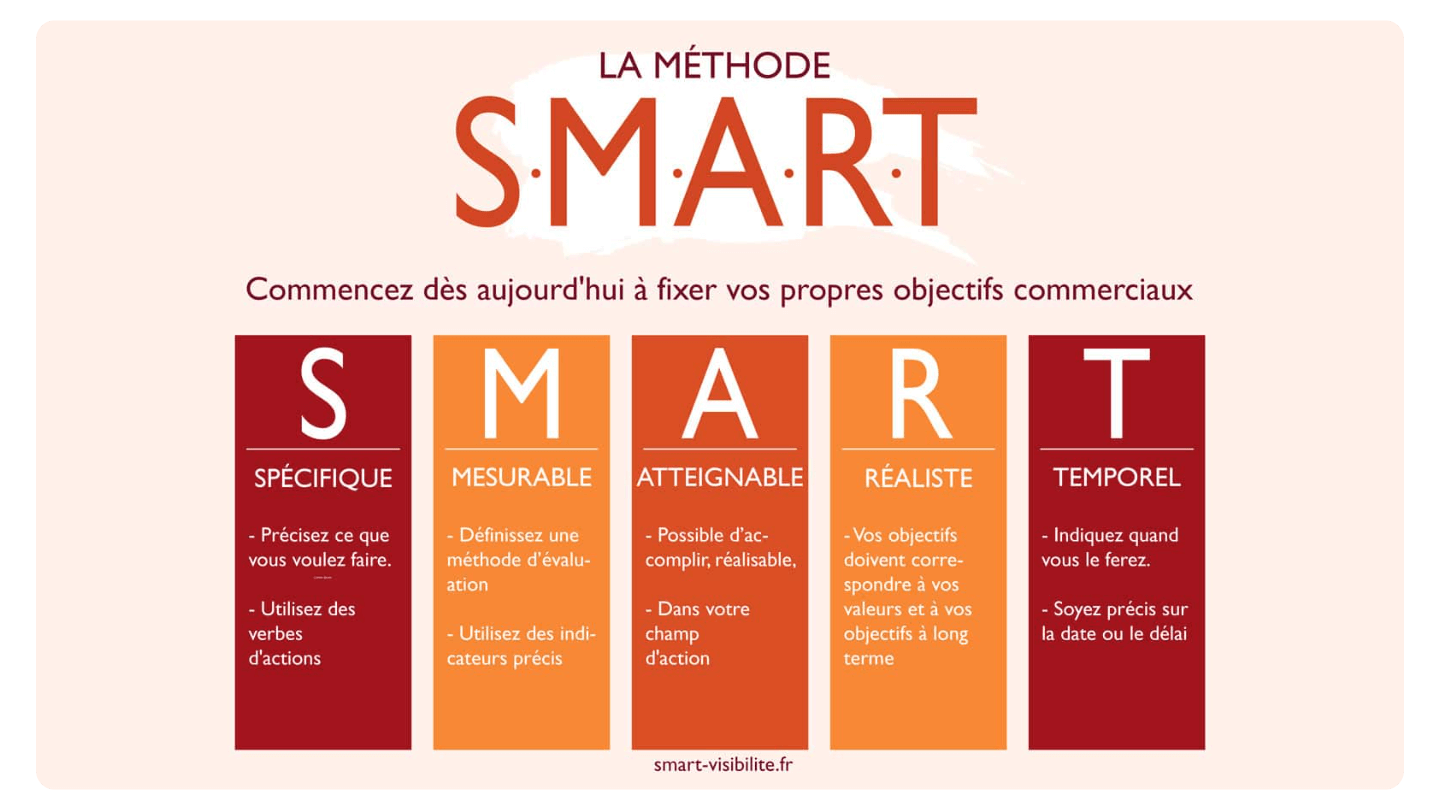
- Generate 50 qualified leads per month via LinkedIn by the end of the quarter
- Increase the conversion rate of your prospecting emails from 2% to 5% in 2 months
- 10 appointments with prospects matching your KPI every week
For each objective, define intermediate sub-objectives.
For example, if you’re aiming for 50 qualified leads a month, set yourself a target of 15 leads a week.
This will enable you to monitor your progress and adjust your strategy along the way if necessary.
Align your prospecting goals with your overall business objectives
Your prospecting objectives must not be disconnected from the reality of your business.
They must be part of your overall sales strategy.
This is where many startups and SMEs go wrong: they set prospecting targets without taking into account their real capacity to manage and convert the leads they generate.
Ask yourself these essential questions:
- What is your sales target for the year?
- How many new customers do you need to acquire to reach it?
- What is your average lead-to-customer conversion rate?
- What is the average value of a customer over its lifetime (LTV)?
- How many leads can your sales team handle efficiently?
From there, you can determine how many qualified leads you need to generate each month, week or day to reach your objectives.
Here’s a concrete example: Let’s say your goal is to achieve sales of 1 million euros this year.
Your average shopping basket is 10,000 euros, so you need 100 new customers.
If your lead/customer conversion rate is 10%, this means you need to generate 1,000 qualified leads over the year, or around 83 per month.
Don’t just set quantitative targets.
Include qualitative objectives in your sales prospecting plan too. For example:
- Improve lead qualification to increase your conversion rate
- Reduce the average time between first contact and signature
- Increase your prospects’ satisfaction with your sales process
Don’t be afraid to be ambitious, but keep it realistic.
Goals that are too easy won’t push you to excel, while unattainable ones risk demotivating your team.
Salesdorado tip Don’t underestimate the importance of this step!
Taking the time to define clear, aligned objectives will enable you to concentrate your efforts where it really counts.
It’s the basis of effective and profitable prospecting.
Review your objectives regularly (at least quarterly) to ensure that they remain relevant to the evolution of your market and your business.
Step 2: Identify and segment your target audience
You’ve defined your objectives – bravo!
Now you need to determine exactly who you’re going to target.
Effective prospecting is above all targeted prospecting.
Create your Ideal Customer Profile (ICP)
The ICP (Ideal Customer Profile) is the identity card of the ideal company you want to sell to.
It’s not a person, but an organization that derives maximum value from your product or service.
To define your KPI, ask yourself these questions:
- What business sector does this company operate in?
- What is its size (number of employees, sales)?
- Where is it located geographically?
- What are its main challenges and objectives?
- How mature is the technology?
Salesdorado tip Salesdorado tip: Analyze your current best customers.
What do they have in common?
This is an excellent basis for defining your KPI.
Develop your buyer personas
Once you’ve defined your KPI, dive into the details by creating your buyer personas.
These are typical profiles of the decision-makers within your KPI.
We’ve prepared an article on the subject: ICP vs Buyer Personas, to help you understand the difference between ICP and Buyer Personas. 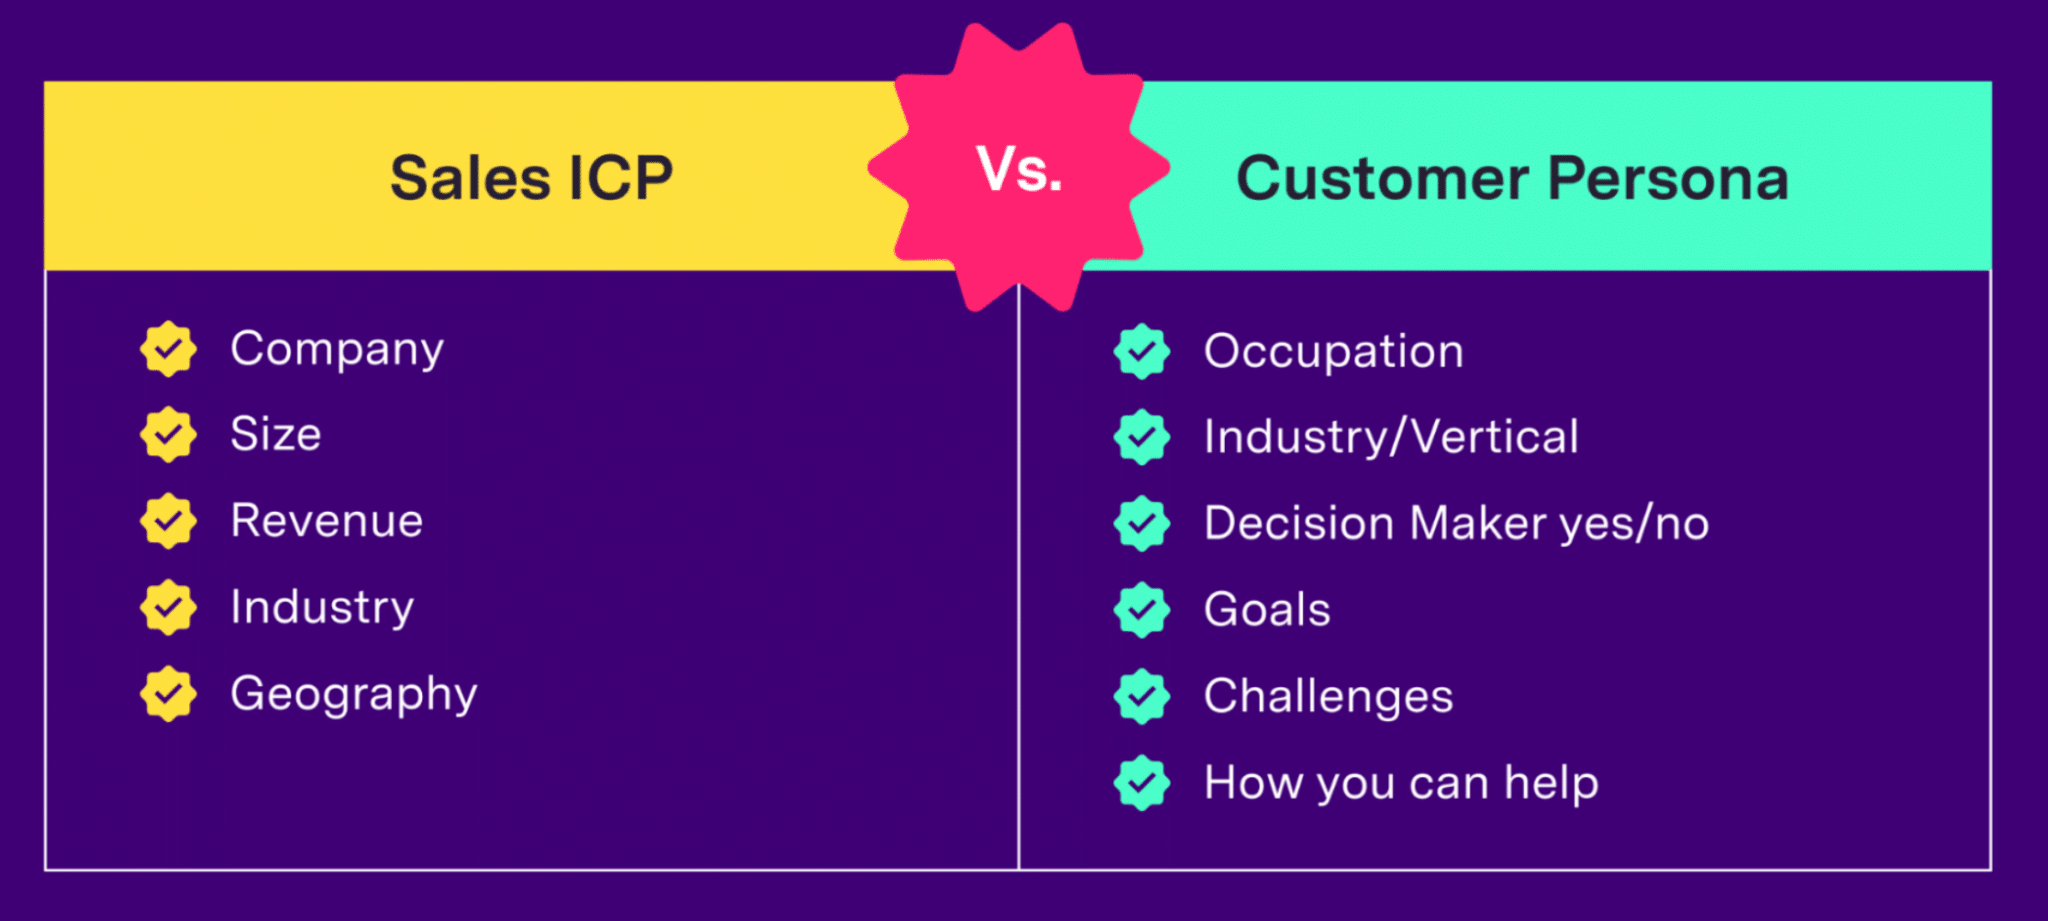
- His position and responsibilities
- Professional and personal goals
- His main daily challenges
- Buying criteria
- His favorite sources of information
Don’t hesitate to create several personas.
In a company, several people may be involved in the purchasing process.
Segment your prospect base
Now that you have your KPI and buyer personas, it’s time to segment your prospect base.
Segmentation will enable you to adapt your approach to each group to maximize your chances of conversion.
Here are a few classic segmentation criteria, which are still the basis for B2B sales:
- Company size (VSE, SME, ETI, Key Account)
- The business sector
- Geographical location
- The level of maturity of your offer
- Revenue potential
Salesdorado tip Create a scoring system to prioritize your prospects.
Assign points based on criteria such as correspondence with your KPI, urgency of need, or available budget.
And finally, focus first on prospects with the highest score.
Step 3: Choose your prospecting channels
Now you know who you’re targeting.
The next step is to determine how to reach them effectively.
This is where prospecting channels come into play.
Evaluate the different channels
There are many different prospecting channels, each with its own advantages and disadvantages:
- The telephone prospecting offers a direct, personalized exchange with your prospects, even if it can sometimes be perceived as intrusive if not handled properly.
To avoid falling into this trap, discover the keys to successful telephone prospecting. - The e-mail prospectinghas the advantage of being inexpensive and easy to automate, but can suffer from low open rates in overloaded inboxes.
- The social sellingparticularly via LinkedIn, has established itself as an excellent means of networking and establishing your expertise.
But remember, this approach takes time to build a credible online presence. - Trade shows and events offer the opportunity to meet many qualified prospects in a short space of time, but can be costly and time-consuming.
- Finallyinbound marketing attracts prospects who are already interested in your area of expertise, but results can take time to show.
Salesdorado tip Don’t limit yourself to just one channel.
Combining several approaches is often the most effective way to maximize your impact and chances of conversion.
Salesdorado tip Tired of Excel files? Good CRM software takes prospecting to a whole new level. Discover our selection of the best free CRM software
Adopt a multi-channel approach
The multi-channel approach, which involves mobilizing several channels in your prospecting efforts, increases your chances of reaching your prospects where they are most receptive.
Here’s an example of a multi-channel sequence:
- Day 1: LinkedIn connection + personalized message
- Day 3: Presentation email
- Day 5: Phone call
- Day 7: Sending valuable content by email
- Day 10: Telephone follow-up
Adapt your channels to your targets
Not all channels work in the same way for all targets.
Use your buyer personas to determine the most relevant channels for each segment. For example:
- Young startups are often more receptive to social networks
- Key accounts may require a more formal approach, combining emails and phone calls.
- The professions are sometimes easier to reach by telephone
Test different channel combinations and measure the results.
Over time, you’ll identify the most effective sequences for each segment of your target audience.
And remember: whatever channel you choose, the quality of your message is paramount.
Always make sure you’re bringing value to your prospect, rather than simply selling them your product or service.
The choice of channels is a key step in building a prospecting plan.
It must be well thought-out and aligned with your objectives, your target and your resources.
Of course, don’t hesitate to experiment and adjust your approach according to the results obtained.
The culture of testing must be at the heart of your prospecting strategy.
Step 4: Create your prospecting sequence
Now that you’ve identified your targets and chosen your channels, it’s time to structure your approach by creating what’s known as a prospecting sequence.
This is a key element of your prospecting plan.
A good sequence enables you to interact with your prospects in a coherent and relevant way.
It increases your chances of conversion.
Define the number and frequency of touchpoints
The first step is to determine how many times and how often you will contact your prospects.
There’s no golden rule, but here are a few guidelines:
- Aim for between 6 and 12 contact points over a period of 3 to 4 weeks.
- Space your interactions 2 to 3 days apart at first, then gradually increase the interval.
- Tailor the frequency to your prospects’ reactions.
Salesdorado tip Don’t be afraid to be persistent, but keep it professional.
Most sales are closed after the 5th contact.
Create valuable content for every interaction
Every contact point in your sequence must bring value to your prospect.
So don’t just repeat your sales pitch every time.
On the contrary, vary your approach. For example:
- First contact: Introduce yourself briefly and explain why you’re contacting us.
- Second contact: You share relevant content (case study, white paper, blog article) related to your prospect’s challenges.
- Third contact: You propose a discovery call to understand the prospect’s specific needs.
- Next contacts : You alternate between content sharing, feedback requests and tailored value propositions.
Automate certain steps in your sequence
Automation can greatly improve your prospecting efficiency, provided it’s used intelligently.
Among the classic elements you can automate :
- Sending follow-up emails
- Reminders for calls to be made
- Update prospect status in your CRM
- Send personalized content based on the prospect’s actions
Be careful, however, not to over-automate.
Key interactions, such as discovery calls or answers to specific questions, must remain personal.
Salesdorado tip Use tools like HubSpot or Pipedrive to automate your sequences while retaining a personal touch.
Example of a B2B prospecting sequence:
- Day 1: Personalized introductory e-mail
- Day 3: LinkedIn connection + personalized message
- Day 5: Phone call (if no answer, leave a voice message)
- Day 8: Email with relevant content (case study, white paper)
- Day 11: Telephone follow-up
- Day 15: Email for a discovery meeting
- Day 20: Final LinkedIn or email reminder
Don’t forget that a prospecting sequence is not set in stone.
You need to test different approaches, analyze the results and make ongoing adjustments.
The key is to find the right balance between persistence and respect for the prospect.
A well-designed prospecting sequence keeps you at the forefront of your prospects’ minds throughout the sales cycle.
It structures your approach, ensures consistent follow-up and increases your chances of turning leads into customers.
Take the time to design it carefully, and don’t hesitate to refine it over time in line with your results.
Salesdorado tip Tired of Excel files? Good CRM software takes prospecting to a whole new level. Discover our selection of the best free CRM software
Step 5: Prepare your resources and tools
You’ve defined your objectives, identified your targets, chosen your channels and created your prospecting sequence.
Congratulations!
But before you dive in headlong, there’s one crucial step left: using the right prospecting tools and resources.
This is the key to effective, scalable prospecting.
Build your prospect database
Your database is the heart of your prospecting strategy.
Without qualified leads, even the best sequence in the world will be useless.
Here’s how it works:
- Identify your data sources: LinkedIn Sales Navigator, industry databases, professional directories, etc.
- Enrich your data: Use tools like Clearbit to add relevant information (email, telephone, exact position) to the contacts in your database.
- Clean up your database regularly: remove duplicates, update obsolete information.
A clean database guarantees effective prospecting.
Salesdorado tip Aim for quality rather than quantity.
100 well-qualified prospects are better than 1,000 inaccurate contacts.
Select the right tools
The right tools can make the difference between tedious prospecting and a well-oiled machine.
Here are the essentials:
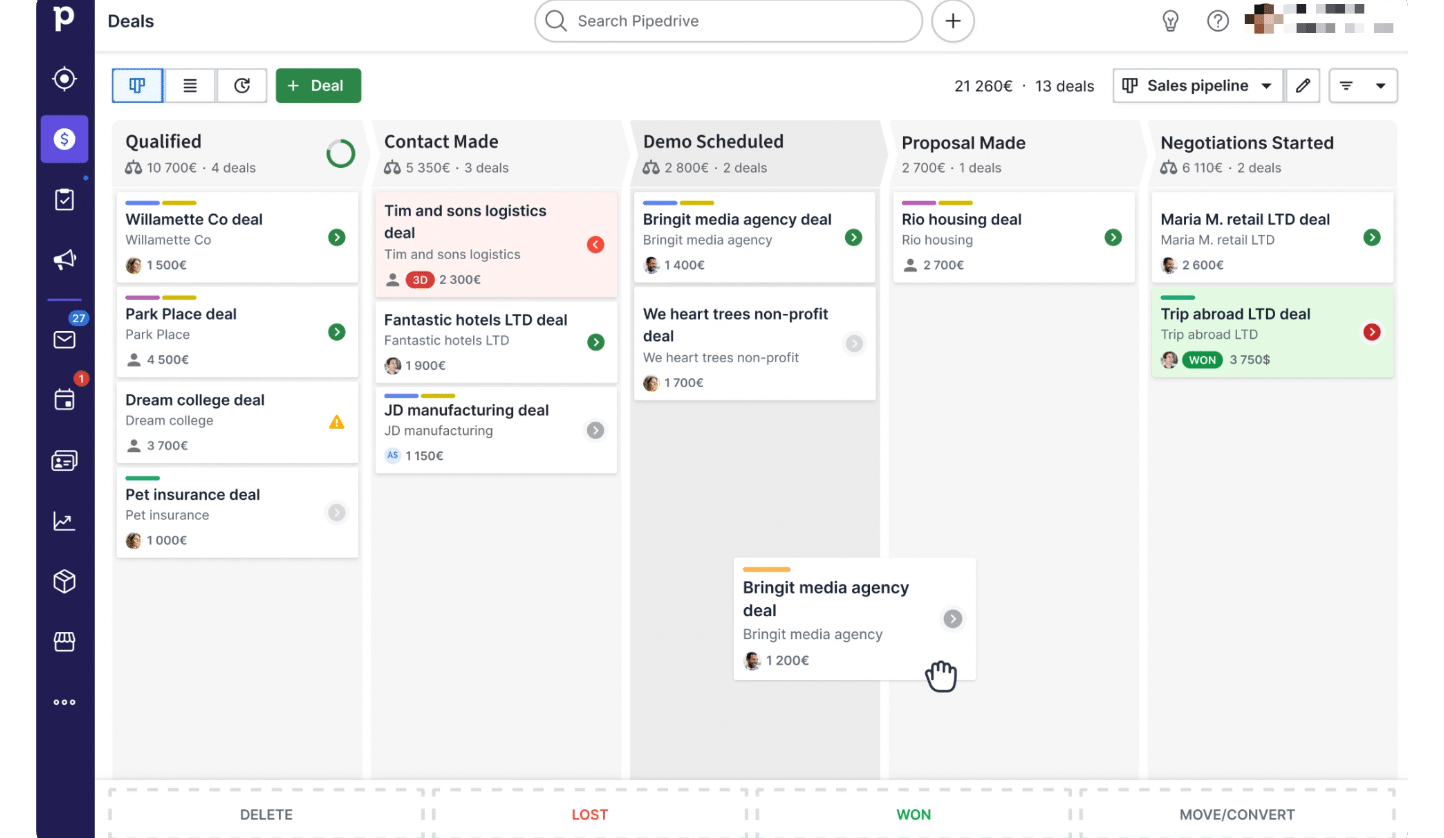
- CRM, the cockpit of your prospecting process. HubSpot, Pipedrive or Salesforce are excellent options, depending on your needs and size.
- Sales automation tools, to manage your prospecting sequences. Lemlist, Outreach or Reply.io are good choices.
- Email signing tools, for professional, tracked signatures.
If you’re interested, we’ve compared the leading electronic signature software. - Appointment-setting tools to make life easier for your prospects.
- Data enrichment tools, to fill in missing information about your prospects.
A word of caution: make sure all your tools integrate well with each other.
The aim is to have a fluid workflow, not to spend your time juggling different platforms.
Create your own scripts and message templates
Having ready-to-use templates will save you precious time.
With this in mind, you can prepare
- From call scriptsnot to recite them word for word, but to have a framework to follow.
- From email templatesfor each stage of your prospecting sequence.
- LinkedIn messages, for connection requests and follow-ups (find out how to prospect successfully on LinkedIn).
- A presentation of your company, such as a clear, concise PDF document that you can send to interested prospects.
Build your team
If you’re lucky enough to have a sales team, make sure they master all the tools and resources you’ve put in place.
Organize training sessions and create a best practice guide.
Remember that preparation is the key to successful prospecting.
Invest time in setting up your resources and tools, and you’ll reap the rewards very quickly.
Remember: a good salesperson spends more time preparing than prospecting!
Step 6: Measure and optimize your performance
You’re there!
Your sales prospecting plan is in place, your sales people are on deck and the first results are starting to come in.
But don’t rest on your laurels: the key to long-term prospecting success is continuous measurement and optimization.
Define your prospecting KPIs
Without clear indicators, it’s impossible to know whether your efforts are bearing fruit.
Here are the essential KPIs to track:
- Response rate: How many prospects respond to your solicitations?
- Qualification rate: How many of the answers really correspond to your KPI?
- Appointment conversion rate: How many qualified prospects accept an appointment?
- Opportunity conversion rate: How many appointments turn into business opportunities?
- Cost per qualified lead How much does it cost to acquire a qualified lead?
Set up regular monitoring
Measurement only makes sense if it’s regular.
Establish follow-up routines:
- Daily: Number of contacts made, responses received.
- Weekly: Response rate, number of appointments made.
- Monthly: Conversion rate, cost per lead, trend analysis.
Use visual dashboards in your CRM to get an overview at a glance.
A complete prospecting plan includes everything from action planning to analysis. 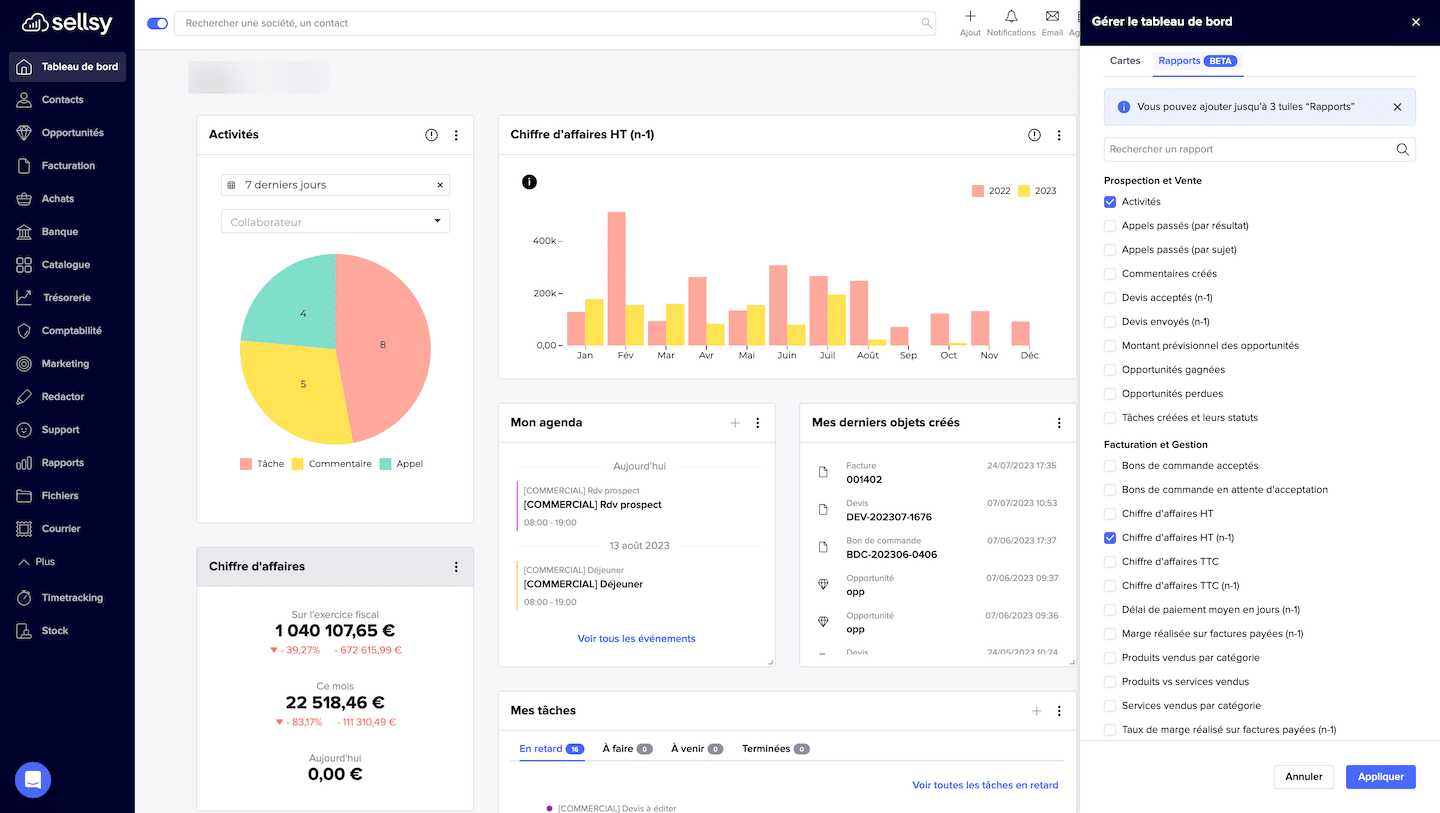
Iterate and continually improve your plan
Prospecting is not an exact science.
What works today may not work tomorrow.
That’s why you need to take a continuous improvement approach.
In your prospecting plan :
- Test different approaches: vary your hooks, your channels, your moments of contact.
- Analyze what works (and what doesn’t): identify the best practices of your best salespeople.
- Train your team on an ongoing basis: share results and best practices at regular meetings.
Listen to your prospects and customers
Finally, don’t forget the most valuable source of information: your prospects and customers themselves.
Ask them regularly for feedback on your prospecting process.
What did they appreciate?
What annoyed them?
Their feedback is a gold mine for optimizing your approach.
Conclusion
And there you have it!
You now have all the keys you need to create a prospecting plan worthy of the name.
From defining your objectives to optimizing your performance, identifying your targets and creating your sequence, you’ve got all the ingredients you need to turn your prospecting into a veritable machine for generating qualified leads.
Remember: a good prospecting plan is never static.
It evolves, adapts and improves over time.
Don’t be afraid to experiment, to test new approaches, to question your habits.
The key to success lies in your ability to adapt quickly to market feedback.
Finally, always remember that behind every prospect is a human being.
Of course, tools, processes and KPIs are essential.
But never forget the importance of empathy, listening and personalization in your sales approach.
We tend to forget this, especially on digital channels!


