

- Don’t launch the project if your product catalog is due to change in the following months: you run the risk of redoing everything.
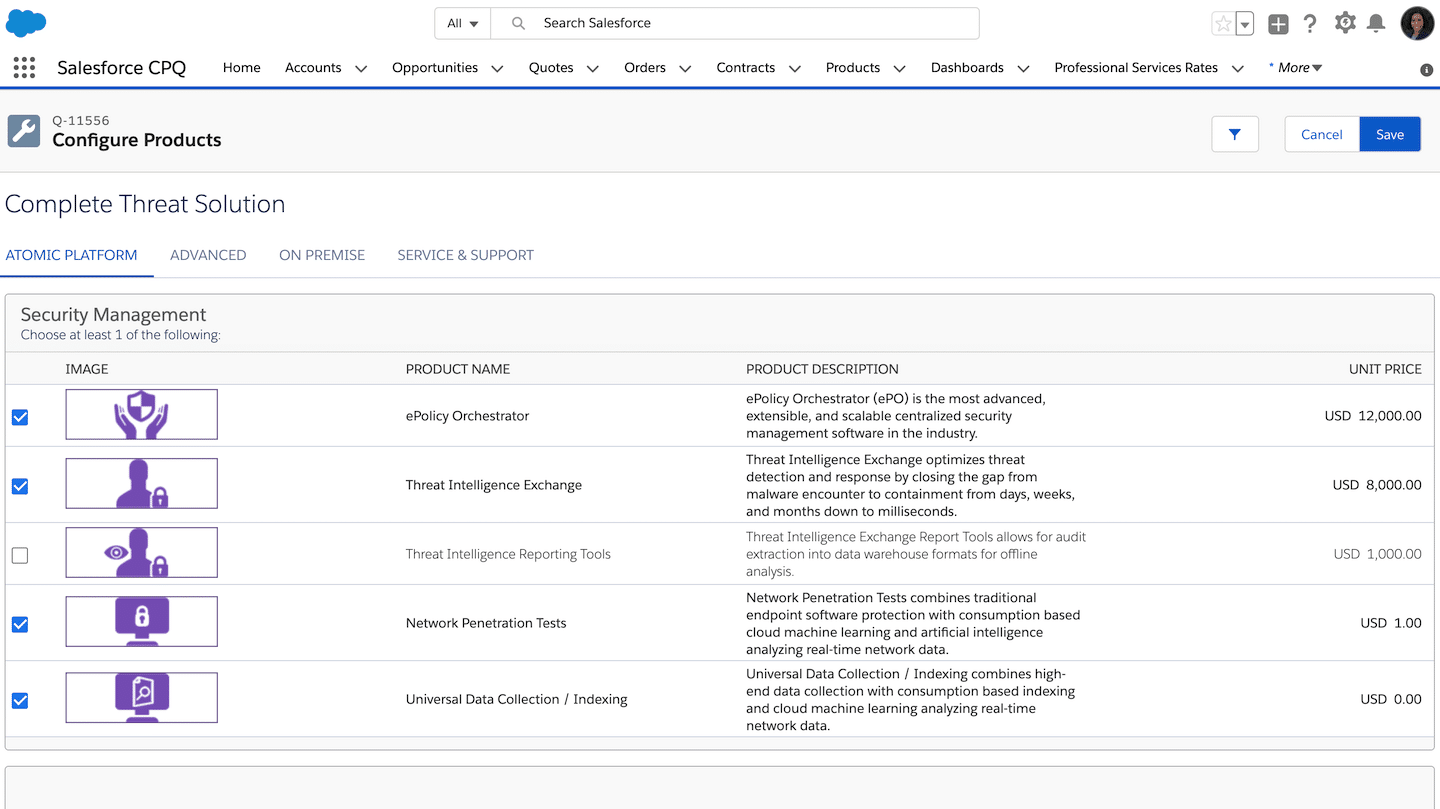
- Build the products and their attributes without worrying about pricing, which comes later.
- Only tackle the calculation rules once all the products are properly built.
- Before setting up approval, draw up a table of all the possible cases.
- Promo codes, sales reps’ bonuses: keep these rules in Custom objects alongside CPQ rather than hard-coded in the tool.
Watch outNovember 2026 update: Salesforce no longer sells CPQ licenses to new customers. If you are already a customer, you can keep using it, add users, renew your licenses and keep support. For a new project, Salesforce now offers Revenue Cloud Advanced. This guide is therefore for companies already running CPQ.
To carry out a Salesforce CPQ configuration project successfully, I advise my clients to follow these 5 steps:
- Take the time to properly define the attributes of your products,
- Choose the screens your sales reps will use,
- Define your calculations,
- Define your approval rules,
- Only at the very end, design your quote.
This means a big effort to structure your needs before your CPQ project even starts, to make sure the final document matches your vision – in particular your functional requirements, from language to contract and amendment management, without forgetting the integrations with your software ecosystem.
The 5 steps of a Salesforce CPQ configuration project
1. Define the attributes that characterize your products
The first step is to define precisely the attributes that characterize your products – and they are not the same depending on what you sell. This lets you build your catalog around these criteria and start importing the files from Excel spreadsheets.
For example, if I sell batteries, the useful attributes to keep may be the battery’s lifespan and its weight. Those same attributes would make no sense for another business. Out of the box, Salesforce CPQ provides many attributes such as the product family, the product code (a must!), the description.
And depending on how you interact with the back office, you may have to multiply some products.
For example, if you sell T-shirts, the customer needs to know the size and the color: for you, these are simple details at the quote level, but the back office probably handles them as separate products – size, color, etc.
Another B2B example: I sell accounting engagements, in the form of 3 product families:
- Off-the-shelf projects: annual accounts, articles of association, etc.
- Number of consulting days, priced according to the consultant’s profile
- Subscriptions: bookkeeping, administrative management, etc.
On top of that, I create packaged offers – for example annual accounts + bookkeeping.
At configuration time, you absolutely must:
- tell subscriptions apart from one-shot products
- tell the different product families apart
- identify which products can be sold inside offers and which can be sold on their own
And all this without ever asking yourself about pricing, which is left for later (otherwise it adds too much complexity to this step and risks derailing the project).
Then, from there, you create the product attributes. How do you define attributes? They are fields you create on the products for various reasons:
- grouping things together
- triggering special processing
- aggregating data
For example, if you need to calculate the cost of shipping by post, you would do well to add a “Weight (kg)” field on the product object so you can calculate the total weight to deliver.
Another example: a certain number of products must trigger the addition of a clause in the quote sent to the customer. To do this, you can simply add a checkbox on the products concerned.
2. Define the screens for your sales reps
Your sales reps need clear screens that let them build a quote as easily and quickly as possible.
Here are the main screens to take into account:
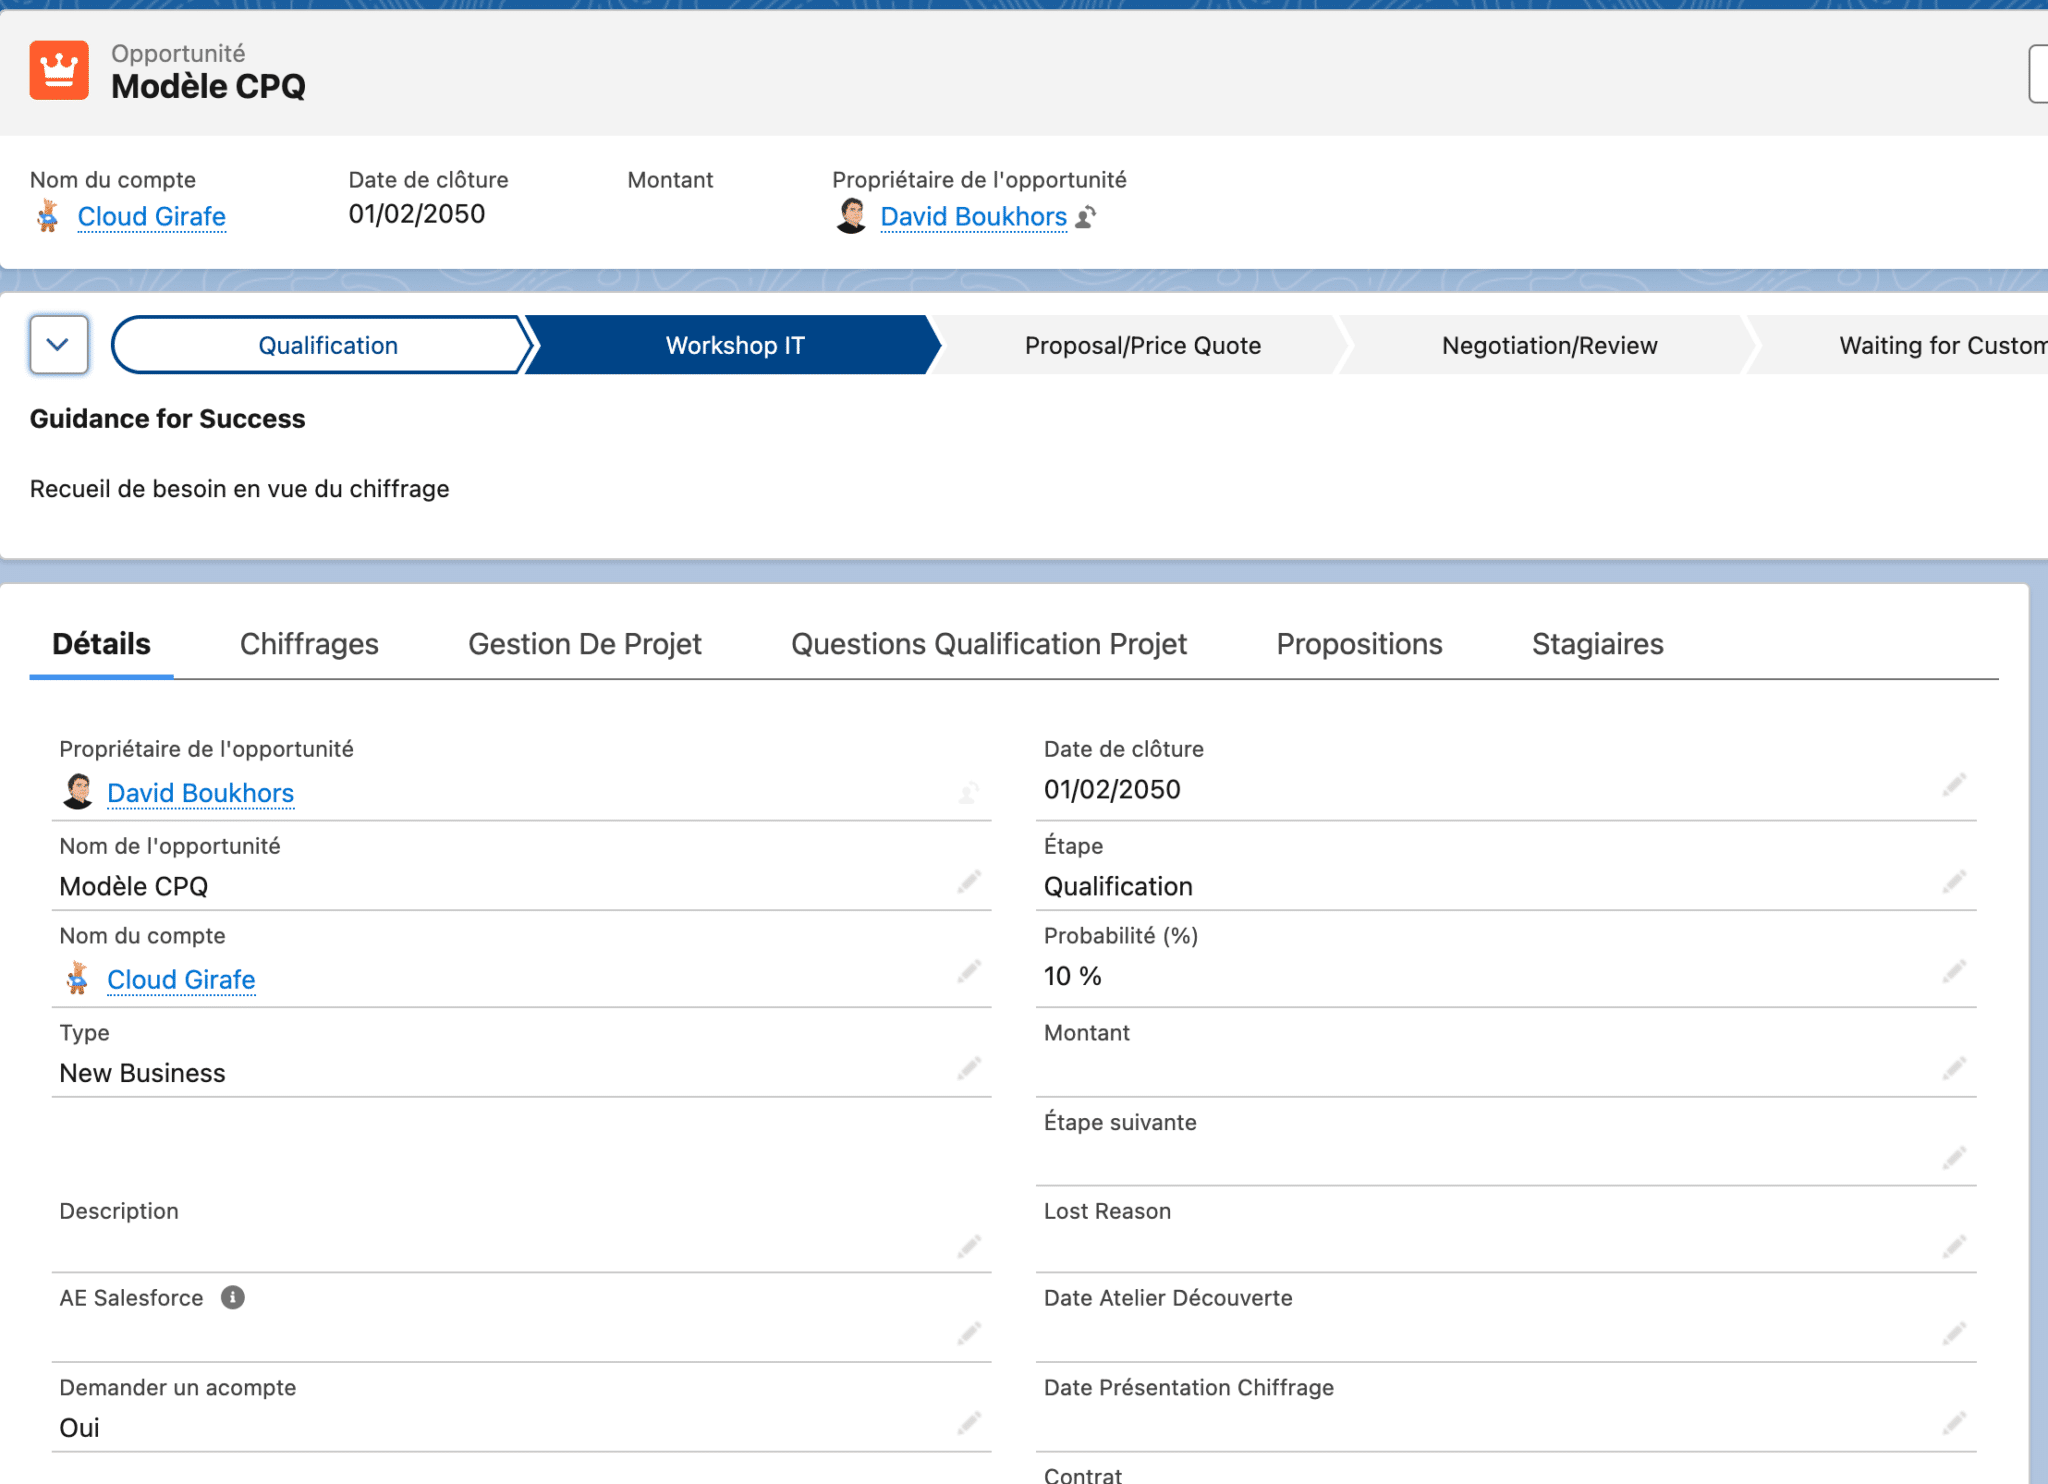
The Salesforce opportunity screen: it is often forgotten, but it is necessarily affected by the arrival of CPQ. Some fields become necessary, such as the contact receiving the quote, the service start date, the ARR, etc. Sometimes you will even need to add new statuses such as “quote pending approval”, “quote sent”, etc.
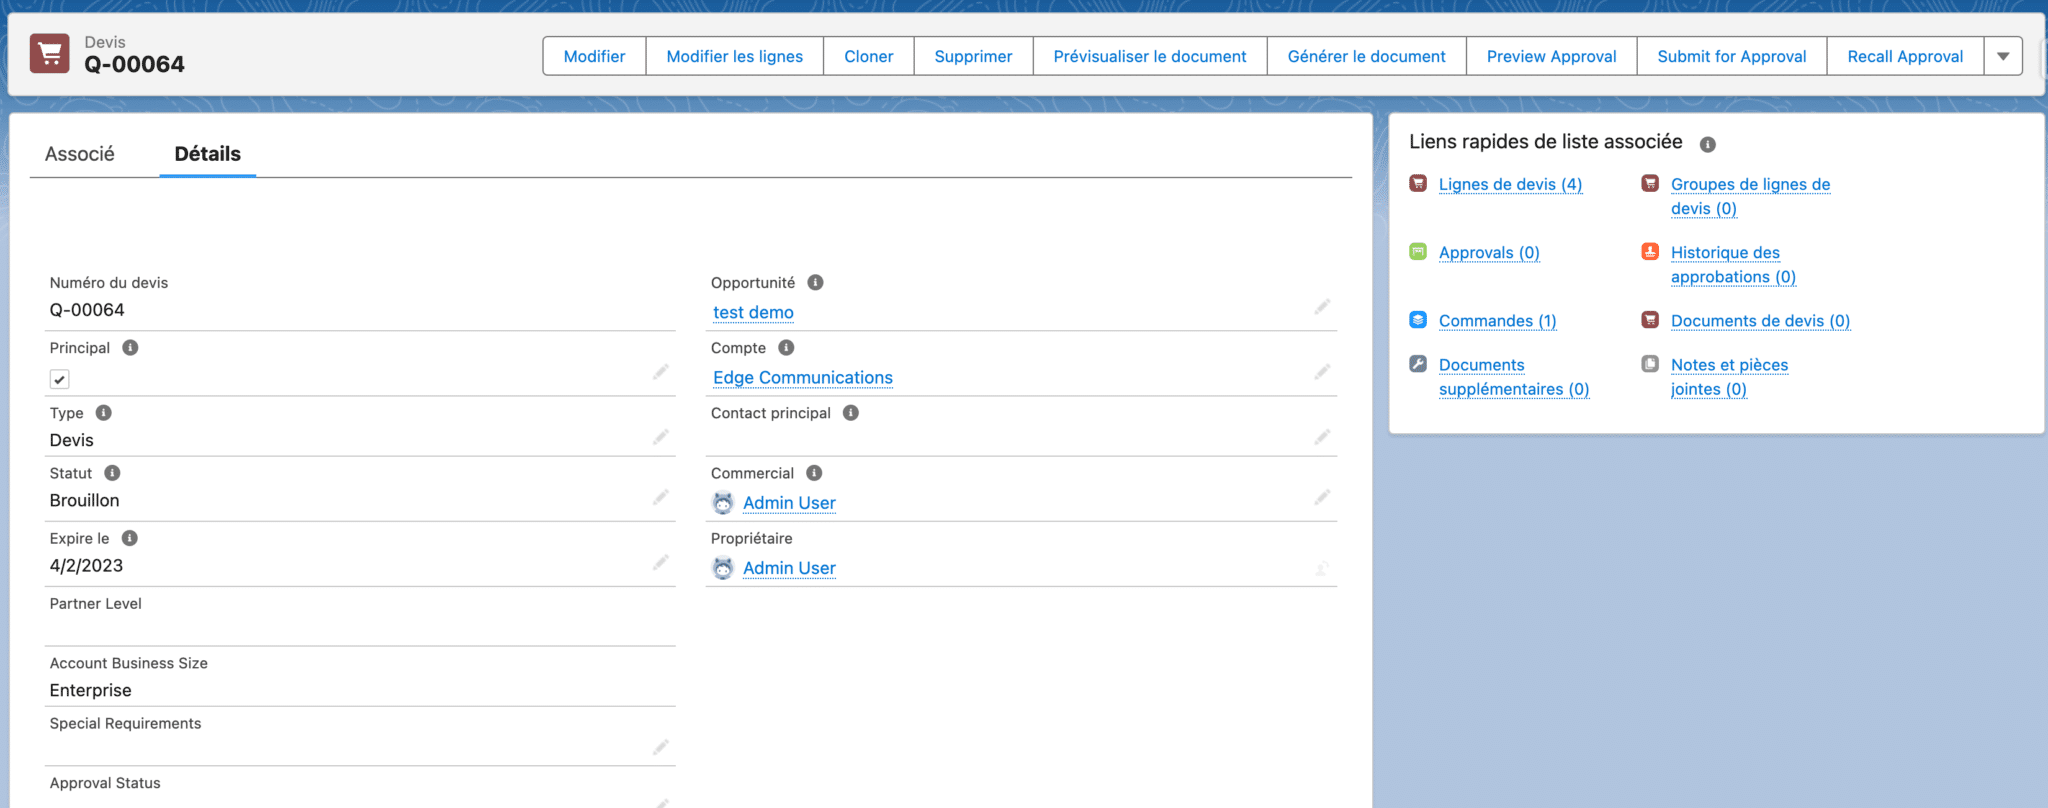
The Salesforce quote screen: this screen shows the basic quote data and lets you enter the CPQ screens, or generate a PDF quote for the customer.
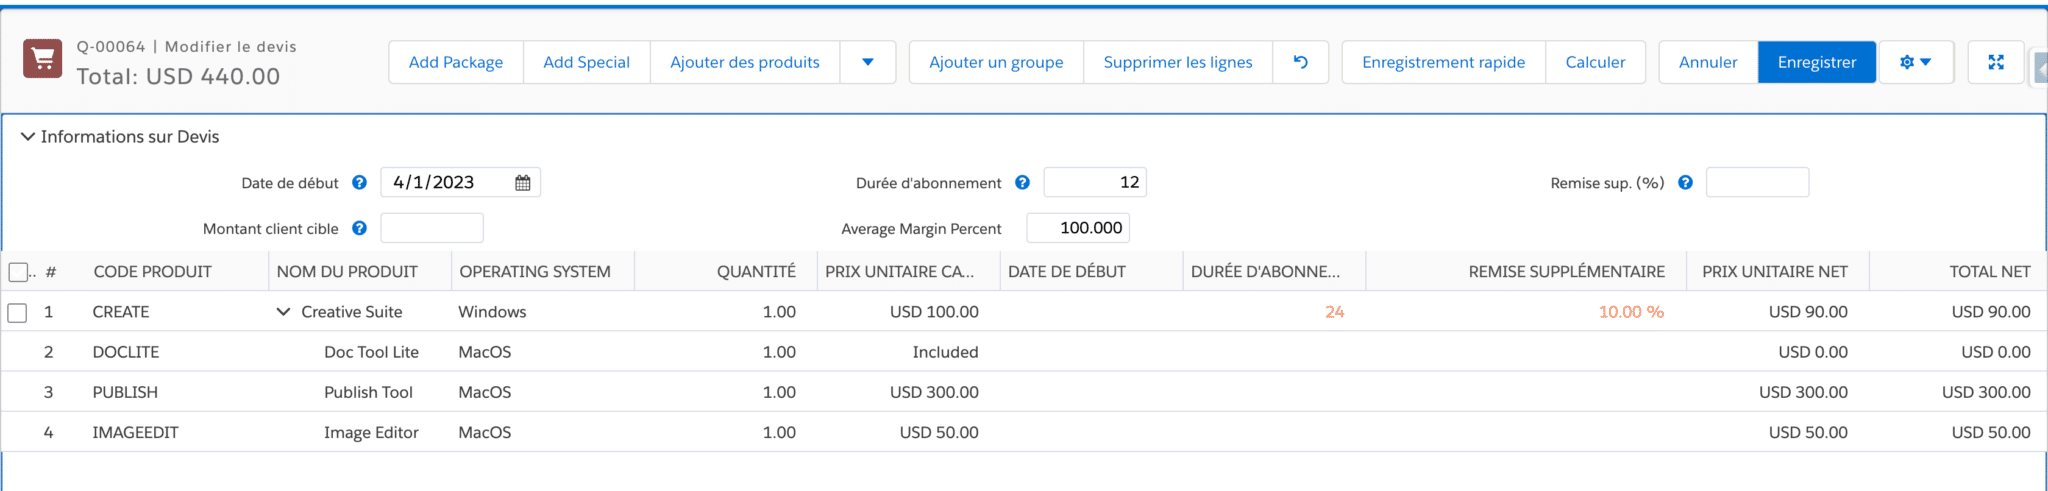
The “Quote Line Editor (QLE)” screen: this is the most important CPQ screen. It shows all the products in the quote, their quantity, their list price and their selling price. The screen lets you add products from the chosen catalog and display useful aggregated fields (total for the service family, total discount amount, amount of stock to secure, etc.).
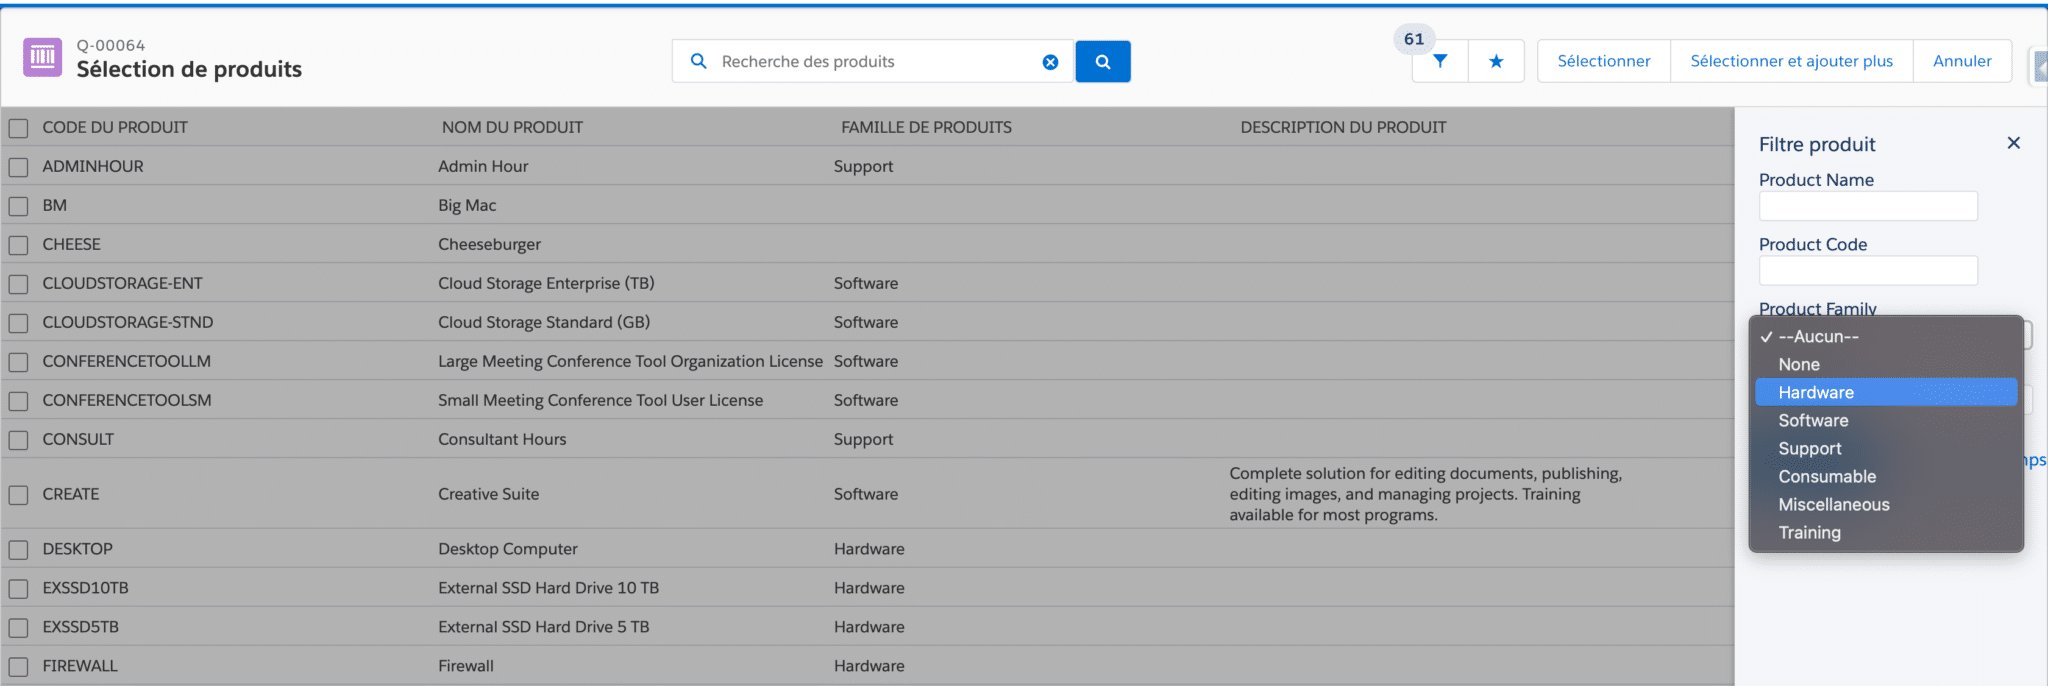
The product selection screen: it lets you choose the products you want. Note that you can create “Custom Action” buttons to pre-filter by family or by other selection criteria. You can quickly pick a product by its product code, its name, etc.
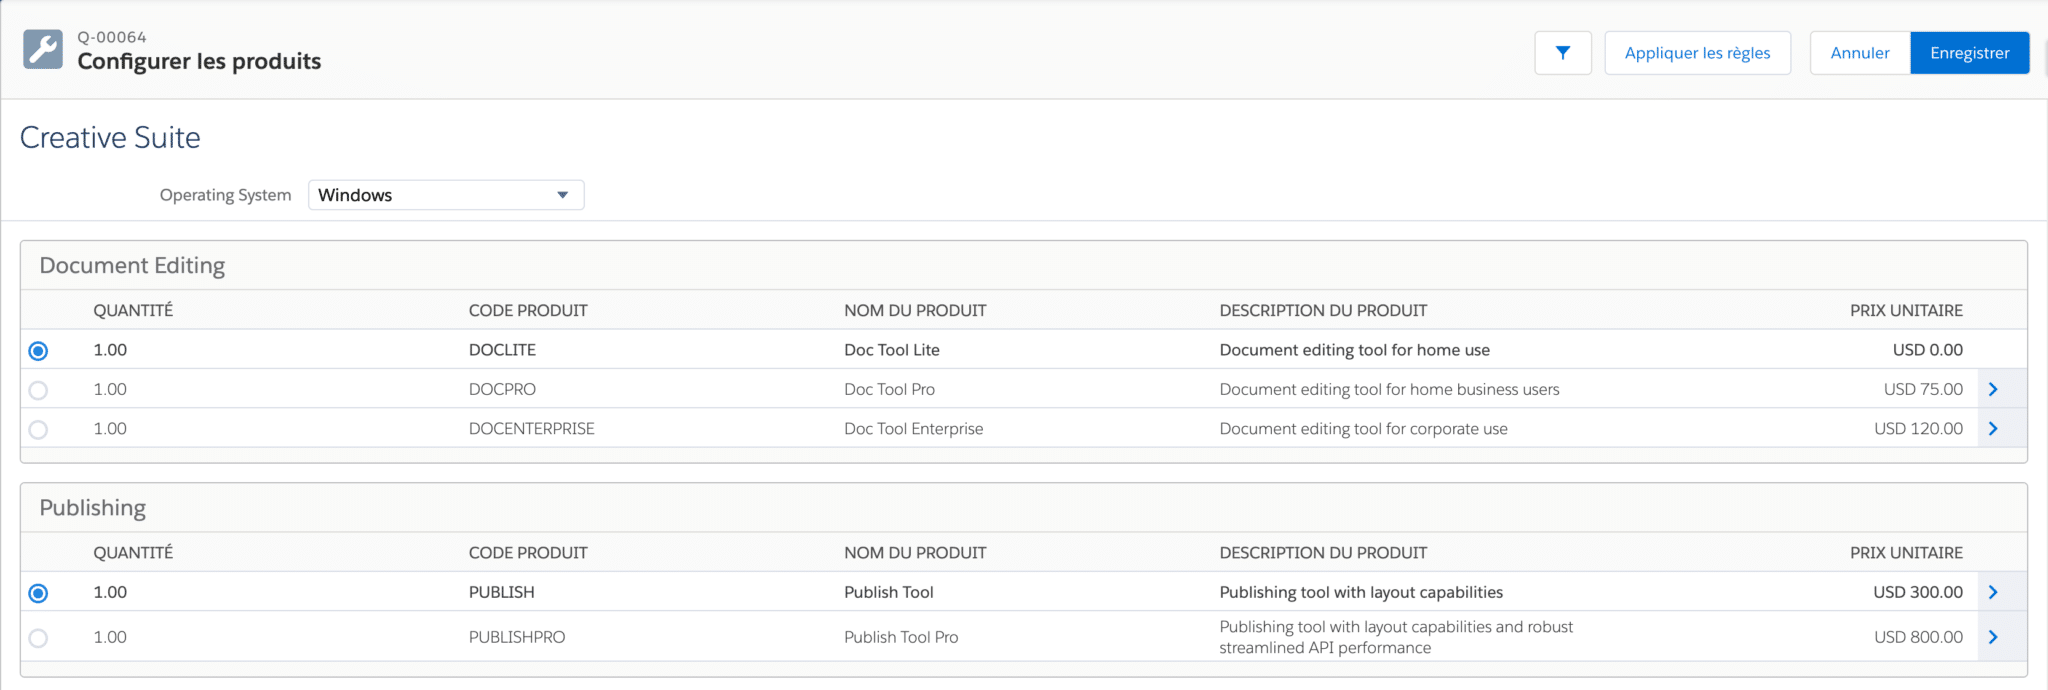
The configuration screen: this is the screen where you configure your packaged offers, called “Bundles”. It lets you choose the options included in your offer. Your CPQ administrator can make data entry easier by applying compatibility rules, exclusion rules and automatic entries based on your choices.
Going furtherSalesforce CPQ guided selling is a powerful tool that will let your reps (even beginners) ask your prospects the right questions and deliver an optimized quote in no time. “Custom actions” will let your sales reps quickly select products by family, and “product rules” will let them automatically add the products the quote cannot do without (warranty, shipping costs, insurance, etc.)
3. Define the calculation rules
You will now define, one by one, all the values to calculate:
- Complex prices based on rate grids
- The salesperson’s commission
- Automated discounts
- VAT
- Etc.
Watch outOnly follow this step once you are sure that all the products are properly built and that nothing is missing. Otherwise you risk having to start all over again.
CPQ has a powerful calculation engine. You can of course calculate a total VAT amount, the total weight of the items, and add, subtract, divide and multiply all the available information.
A concrete example: if I sell IT equipment and wifi routers, with a router able to handle 6 connections, I can automatically calculate the number of routers required based on the other items in the quote.
Even better! I can also base it on previous purchases. And this also applies to calculating discounts. So I can offer a discount based on the quantity bought in this quote, but also on the quantities already bought in the past.
4. Define the approval rules
Now it is about control, by setting up the Approval Process, which will be triggered under certain conditions. The principle is simple: your sales rep will need a sign-off before being able to send the quote to the customer.
Here are 3 classic approval examples:
- The presence of a product requires approval from a product manager
- The total discount % requires approval from a sales manager
- The payment terms or the customer’s creditworthiness trigger a check by the legal team
To set up this approval easily, I recommend first drawing up a table of all the possible cases.
Watch outMake sure you cover all the possible cases, and avoid redundancies.
And if the standard Sales Cloud approval engine does not suit you, you can go for Advanced Approvals.
Salesforce Advanced Approvals is a (really) powerful tool that lets you go much further, using smarter mechanisms:
- Delegation that can be scheduled while an employee is on leave.
- Smart Approval: a 20% discount has already been approved, so there is no need to go through the same approval chain again when a change is made to the quote.
- Dynamic calculation of approvers for large organizations.
- Approval of several chains in parallel (perfect for getting rid of bottlenecks when one team approves more slowly than the others).
5. Design your quotes
Once your CPQ is ready for your sales reps, all that is left is to build your quote template. Above all, don’t forget that your customers will only see your quote as a PDF.
That makes it all the more important to make it pleasant to read, and above all to include all the useful information. A few examples of key elements to include in your quote:
- Your brand guidelines.
- Your company’s contact details.
- Your customer’s contact details.
- Your sales rep’s contact details.
- A clear list of the services and products sold.
- A separate list for subscriptions, showing the start and end dates, as well as the renewal terms of the offer.
- The payment terms.
- A signature box.
- Your company’s legal notices and, where applicable, your bank details.
If your quote is dynamic, build smart! Instead of creating a new quote template for each situation, think about creating quotes with dynamic sections based on certain criteria. The administrators who will have to maintain and evolve your quote templates will be delighted!
4 things to know before starting a CPQ project
1. Your CPQ processes depend on your product catalog
A warning that may seem obvious but is crucial: before starting a CPQ project, make sure your catalog is up to date and that you do not plan to change it right away.
I have the example of a client who launches a CPQ project in September while knowing that they are changing their catalog in January. They run the risk of having to redo everything, and of sending the whole project off the rails.
2. Don’t tackle the calculation rules too early
The principle of a CPQ project is that there really is an order to follow:
C = Configure. Make sure you know how to build your offers in the tool, with consistent options and automatic option additions. For example, shipping costs added automatically based on the weight of the items.
P = Price. Above all, don’t start this step too early! If the product is not configured correctly, don’t try to calculate a price.
This part includes discounts. CPQ offers System discounts (for example, an automatic discount when a certain quantity is bought, or under a framework agreement with the customer), and discretionary discounts, entered by the sales rep.
Q = Quote: this is the document you send to the customer.
3. Take care to define the target vision of the final document
Worth knowing: in the Anglo-Saxon model, a quote does not have to look nice, it just has to be formal. Whereas in France, we pay particular attention to the document the customer is asked to sign. That is why it is not unusual to use tools such as Conga Composer or Docusign Gen alongside CPQ.
4. Use Custom objects alongside!
Think about using tables/objects alongside CPQ.
For example, to manage a promo code, consider creating a separate table with the following information:
- Promotion start date
- Promotion end date
- Product concerned
- Promotion % to apply
- etc.
That way, the person in charge of promotions does not need a CPQ license and can handle this part without any CPQ training.
Avoid hard-coding too many rules in the tool. It is better to think more generally and use variables. The same goes for calculating sales reps’ bonuses: it is better to create a table containing the rules.
Define the functional requirements for your CPQ project
Your company’s list of functional requirements can be huge. Be careful to prioritize your needs so that you deliver the ones with the highest added value.
The costs and all the implementation effort of a CPQ project rise considerably if every “out-of-the-box” feature has to be customized. I advise first getting a feel for CPQ solutions using the standard features and flows.
To define your list of functional requirements,
- Make sure all your needs are listed and ranked by priority (critical, high, medium, low) according to the main value drivers of the CPQ project.
- Make sure the standard features of your CPQ solution really match your priority requirements, and only consider customization as a second step.
1. Multi-currency and multi-language
CPQ supports all the languages offered by Salesforce, as well as multi-currency. To handle several languages at once, CPQ uses a very powerful “Localization” object.
It lets you go further than standard Salesforce translation. Here, you can translate any text field on the product object. In other words, the same product can be called Mouse in English and Souris in French. Multi-language affects not only the end customer who signs the quote, but also your sales rep who uses CPQ.
This lets you sell products in every language, very useful if your company has bought a foreign business.
Multi-currency works exactly like standard Salesforce. You choose a main currency for your environment. All reports can aggregate data in that currency. You define the exchange rates, either once a year or over defined periods. You can even use third-party tools to fill in the exchange rates automatically.
2. Managing subscriptions and renewals
To manage subscriptions and renewals, the first thing is to define the business rules properly.
The key fields for defining a subscription are on the product object:
- Subscription Pricing: you select “fixed price” if the price depends on a catalog and a commitment period, or “percent of total” if the price depends on other items in the quote (for example, a 1-year warranty worth 12% of the total of the Hardware family products in the quote).
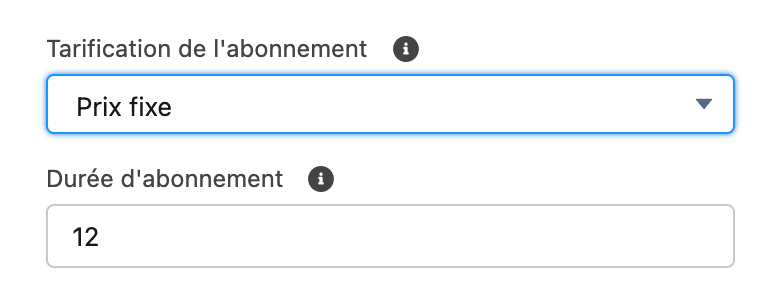
- Subscription Term: this is the product’s commitment period. This field tells you what the price shown in the catalog corresponds to. If the subscription term is 12 months and the catalog price is $100, then the $100 corresponds to a one-year subscription. One of CPQ’s great strengths is its proration calculation. You just have to set the right terms on the products and CPQ takes care of the rest!
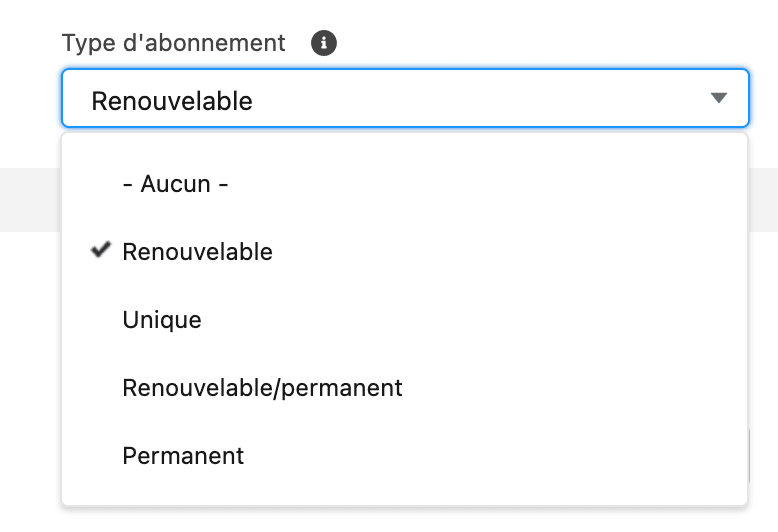
- Subscription Type:
This field defines whether the subscription shows up again at renewal. For example, you can offer a subscription valid for the first year to support new customers.
You can also use the Evergreen type. In this case, the subscription renews tacitly. You will then need to agree on a process that checks the notice period to apply on termination.
3. Managing contracts & amendments
CPQ includes contract and amendment management, and above all gives you a clear process to handle them.
Salesdorado’s tipAn amendment is a change to a subscription during the life of the contract. For example an upgrade, a quantity increase, a reduced commitment, added options, etc.
I often see that my clients have no real process for handling amendments before CPQ arrives.
The main principles:
- A contract must be activated before amendments can be created.
- The renewal opportunity must be created as early as possible, and it automatically absorbs all the changes. So on the renewal date, you automatically renew all the original services along with all the add-ons added during the life of the contract.
- The original contract also absorbs all the changes made through the amendment mechanism.
- Renewal creates a new contract. This point sometimes bothers our clients, because their back office sometimes keeps the same contract number even at renewal. In that case, you just need to use the Master Contract concept in Salesforce CPQ.
4. Setting up a portal accessible to partners
The next step is to open CPQ to partners, so they can produce complex quotes and save you a considerable amount of time. To use this feature, you will need Experience Cloud licenses on top of your CPQ licenses.
No more email back-and-forth and reference mismatches! The partner will also know the amount of their margin sooner, and will be able to see the customer’s existing installed base (if you give them access).
To keep discounts under control, we recommend adding an approval process so that the checks and the discounts stay in your hands.
5. Integrations with your software ecosystem
In my view, there are two key integrations with your software ecosystem:
- ERP – inventory & capacity management
Inventory and capacity management is a common request, for which you can turn to tools such as the French monstock or the American topShelf
- Reporting / Pre-accounting
We have already built integrations with many tools. You can use Salesforce’s own billing (now Revenue Cloud Billing: the Revenue Cloud name now covers the suite that replaces CPQ) or connect your Salesforce to any system. The prerequisites: an API and comprehensive documentation. We generally work from a “mapping”, meaning you give us screenshots of Salesforce and of the target tool, telling us that this field goes into that field, etc.
The questions we get over and over.
In what order should you run a Salesforce CPQ project?
In the order of the three letters. C for Configure: knowing how to build your offers in the tool, with consistent options. P for Price: calculating prices and discounts, only once the products are configured correctly. Q for Quote: the document sent to the customer.
What is the Salesforce CPQ Quote Line Editor?
It is the most important CPQ screen. It shows all the products in the quote, their quantity, their list price and their selling price, lets you add products from the chosen catalog and display aggregated fields, such as the total discount amount.
What is an amendment in Salesforce CPQ?
A change to a subscription during the life of the contract: an upgrade, a quantity increase, a reduced commitment, added options. The contract must be activated before amendments can be created.
Does Salesforce CPQ handle several languages and currencies?
Yes. CPQ supports all the languages offered by Salesforce as well as multi-currency. The Localization object lets you translate any text field on the product object, and multi-currency works just like standard Salesforce.
What do you need to open Salesforce CPQ to partners?
Experience Cloud licenses on top of your CPQ licenses. An approval process lets you keep control over the discounts granted by partners.


What the community says.