



- Choose the type of onboarding based on product complexity: self-service, low-touch or high-touch.
- Appoint a single point of contact on the customer’s side and keep information flowing between the sales and support teams.
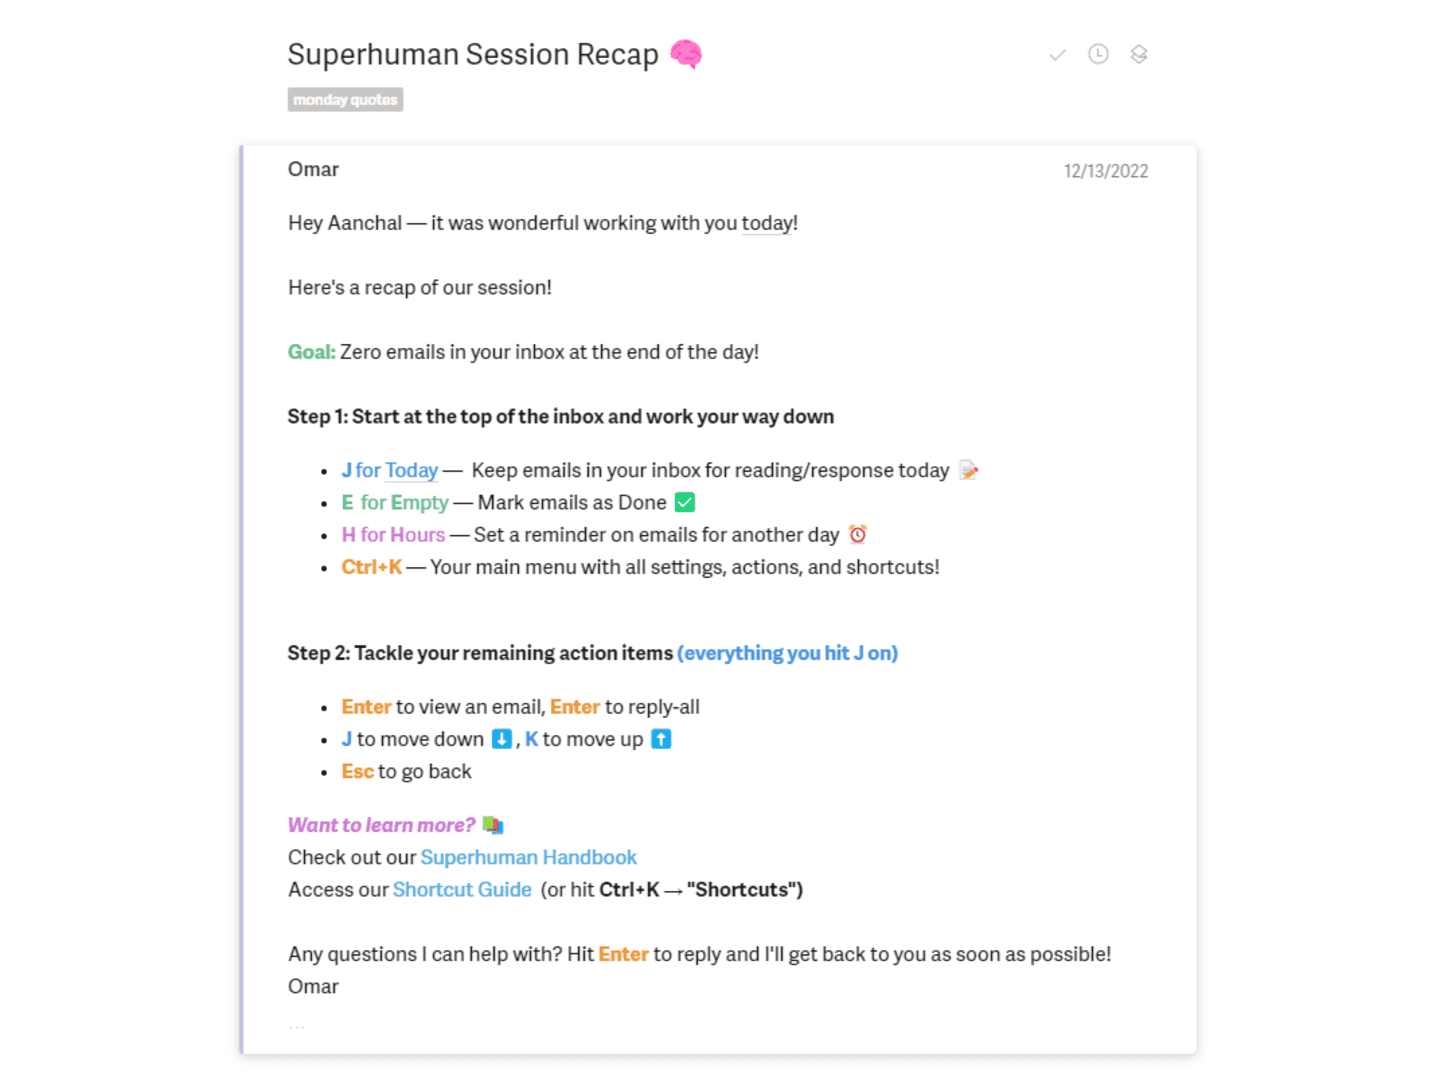
- Send as few emails as possible: centralize resources in a shared document.
- Track time to value, support tickets, CLV, engagement and course completion rate.
- Don’t offer upsell or cross-sell before the 30- and 90-day check-ins.
Customer onboarding sets out several things: communication (Who are the points of contact? How do you reach them?), goals (How are they measured? How do you access the reporting?) and payment (What are the payment terms? How does invoicing work?).
If you want to run a successful onboarding, you will have to go through several stages. We won’t detail them in this article, but here are the four main ones in our view:
- Kickoff meeting: Introductions, setting up the communication flows, and gathering / confirming goals and KPIs.
- Aha moment: Share the first result with the customer, explain the next steps, and explain how that first result fits into the customer’s goal. If it’s a SaaS (self-onboarding), you can congratulate the customer and explain how the first result fits into their goal.
- 30-day check-in: The goal is to solve the problems that keep the customer from getting the most value out of their purchase. This is not the time for upsell or cross-sell. Make sure you stay focused on the first goal, and keep the customer focused on the first goal.
- 90-day check-in: The goal is to validate (or not) the relevance of the solution with the customer. If it’s validated, you can commit them over a longer period. Same as before, this is not the time for upsell or cross-sell. Make sure you stay focused on the first goal, and keep the customer focused on the first goal!
1. Define the type of onboarding
Defining the type of onboarding you want for your customers matters a lot if you want to meet their needs as well as possible. The onboarding you choose depends on what you want: do you want your customer to be independent? Or do you mainly want to build a relationship of trust with your teams?
It’s a very important stage, where you lay the foundation of the customer-supplier relationship.
So before setting up your onboarding, list the things you want to share with your customer, and which type of onboarding you will choose. You can draw on several models:
- « Self-service » onboarding: this type of onboarding works well if you offer a simple product that doesn’t take much time or explanation to get up and running. The method consists of setting up a kind of getting-started guide that lets the customer handle their onboarding on their own.
- « Low-touch » onboarding: this type of onboarding goes a bit further, with in-app product tours or getting-started tutorials, for example. Unlike self-service onboarding, it offers some human support, but never one-to-one. This type of onboarding suits products that aren’t very complex, and many companies use it, such as Zoom, Canva and Mailchimp.
- « High-touch » onboarding: the most personalized type of onboarding, very useful if you offer a complex product that requires several setup steps, for example. This onboarding will lead you to create personalized welcome documents and send summaries of your conversations to your customers, for instance.
2. Choose the company’s points of contact
Once you have chosen the type of onboarding you want to set up, you need to identify the team that will handle it and each person’s role.
First, you can appoint one person on the customer’s side who will be the single point of contact during onboarding.
Then, make sure you set aside time on the kickoff call agenda to appoint a reference person.
3. Bring your teams together
Make sure communication between the sales and support teams works well.
To get good communication between teams, you can make sure support teams are notified when a new customer needs onboarding.
Don’t hesitate to set up a consistent tracking board that the teams can access, to work more efficiently.
4. Choose the right tools
To make customer onboarding easier, choose the right tools.
Setting up a system to welcome your new customers can be fairly heavy, so you’ll need to pick the right tools to get the best possible onboarding experience.
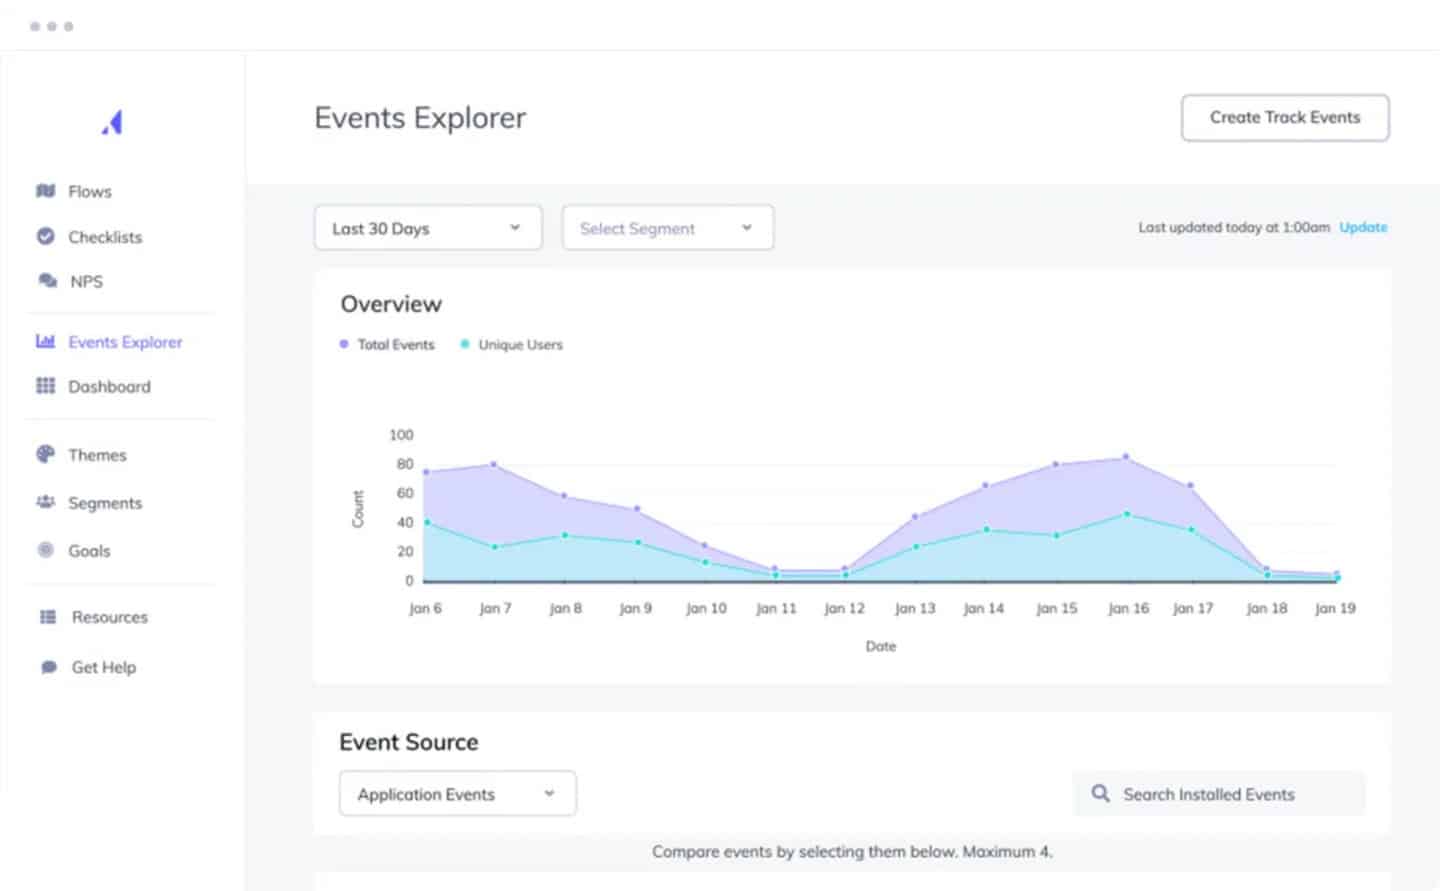
These tools will let you communicate efficiently with your customers, automate some of your tasks or track onboarding KPIs.
Tools like Appcues let you build and continuously test your onboarding flows to improve your onboarding experience.
5. Send as few emails as possible
To make your onboarding easier for your customers to follow, send as few emails as possible.
A large share of the emails we receive gets lost, so there’s no point in sending more and more. Instead, I’d rather advise you to store all the resources your customers will need on a website, for example. It saves them from digging through their inbox for information, and that’s precious time saved during onboarding.
Don’t hesitate to let customers comment, or give them editing rights on the document they’ll update as their onboarding progresses. This document can also serve as a working base to add any thoughts your teams share with your customers and assign them to the matching task.
6. Segment your customers
If you want a more effective onboarding, don’t hesitate to personalize it for your customer segments.
If your products serve a wide variety of customers, some tasks will quite likely be irrelevant to some of them. To target your customers’ needs as closely as possible, you can split them into segments and create onboarding processes suited to each one.
Segmenting customers can be fairly tricky, not least because company size isn’t always the right measure. For example, a team of three and a team of 300 may need the same type of onboarding if they use the product the same way.
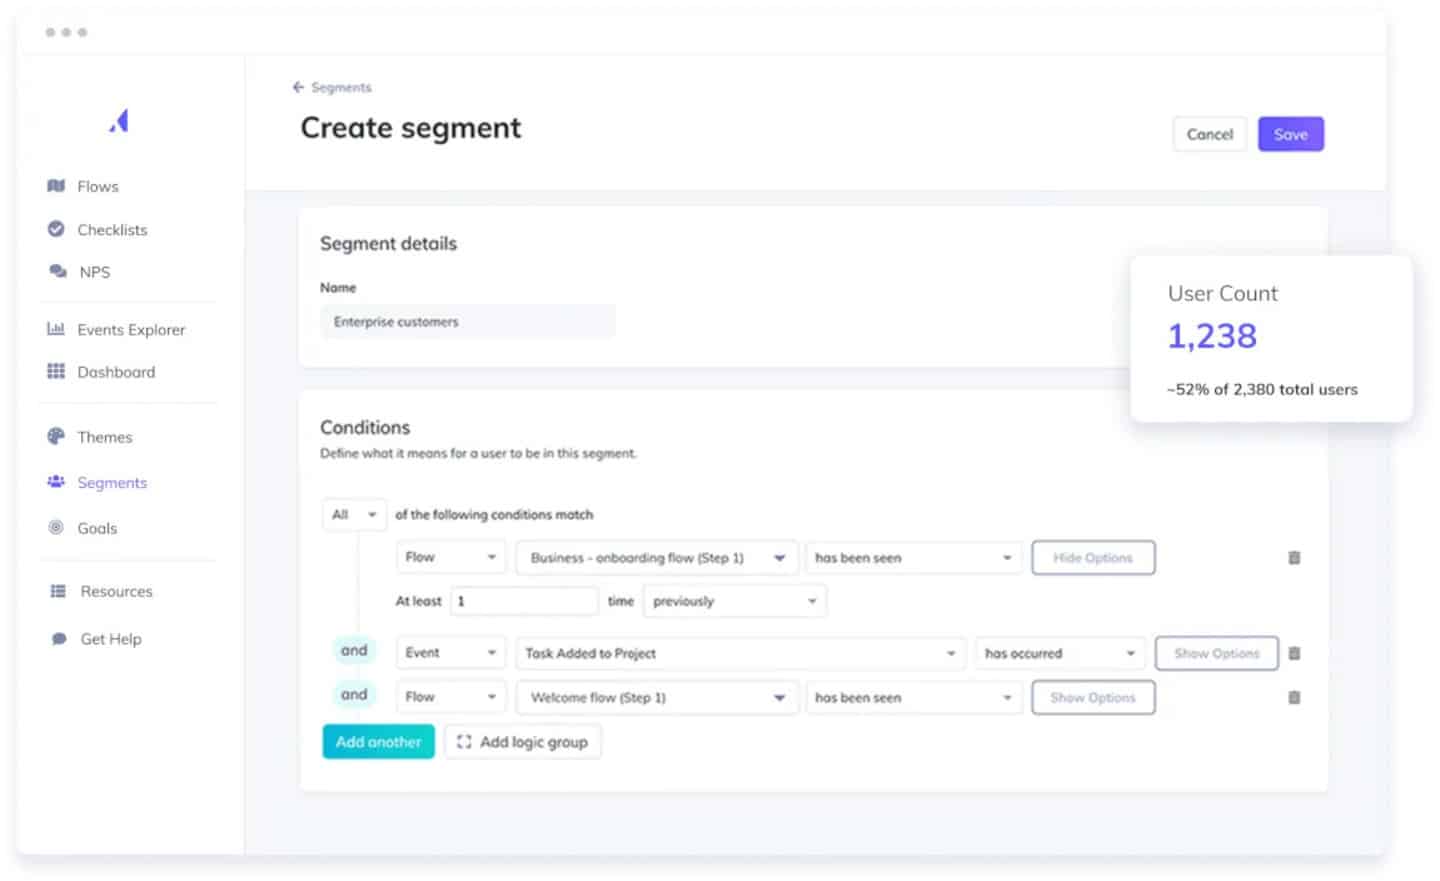
So I recommend defining a complete onboarding template that you can then personalize for each customer, removing irrelevant tasks or adding what’s missing. Over time, this will help you identify what companies have in common (their goals, their timelines, the products they buy…) and split your customers into segments more easily.
You can also choose to personalize your onboarding templates according to your customers’ lifecycle and build templates specific to each task.
7. Automate as many tasks as possible
To offer the most effective onboarding possible, don’t hesitate to personalize it by automating some tasks.
You can of course split your customers into segments, or create separate onboarding templates for each segment, which you can also adapt to the customer’s lifecycle.
For more efficiency, you can also automate some tasks in the onboarding process. There’s a whole range of « learning management systems » (LMS) such as Skilljar that let you set up personalized learning paths and guide customers automatically.
This type of tool lets you host all your training content in a central online repository that customers and your team members can access. It’s a huge time saver, especially for organizing training content.
8. Build a relevant tracking board
If you want to follow the progress of each onboarding, don’t hesitate to build a clear and relevant tracking board.
This board will let you define the onboarding phases and get a real-time overview of the onboarding processes of all your customers.
It’s a must if you want to keep improving your onboarding process. The data you collect through this board will help you, for example, identify the customers who need help the most, and direct efforts where needed.
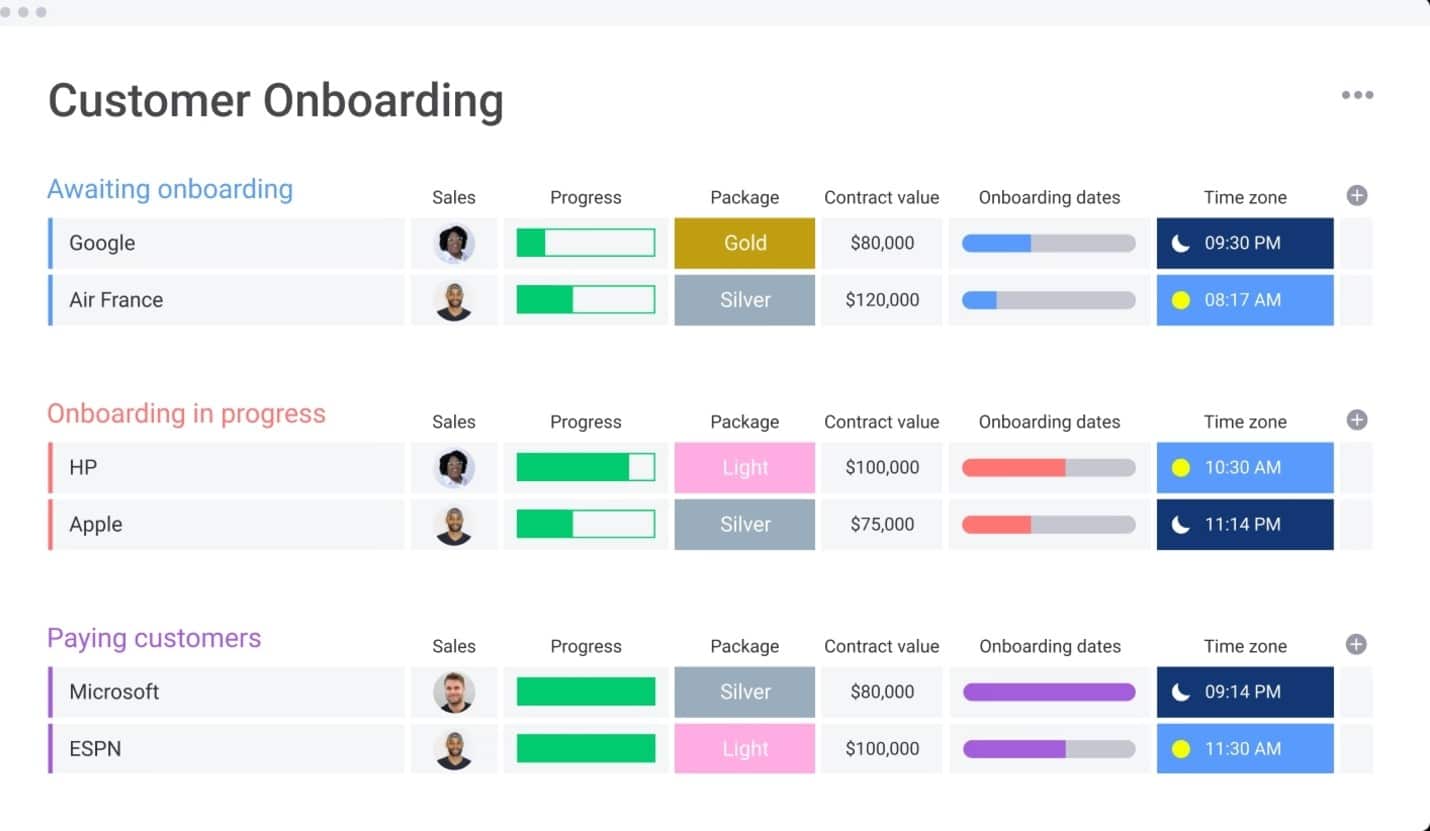
Over time, this data will also help you identify the difficulties customers run into and why some of them drop out before they even finish onboarding.
9. Analyze performance
To improve your onboarding, you’ll first have to analyze your performance.
1. Time to Value (TTV)
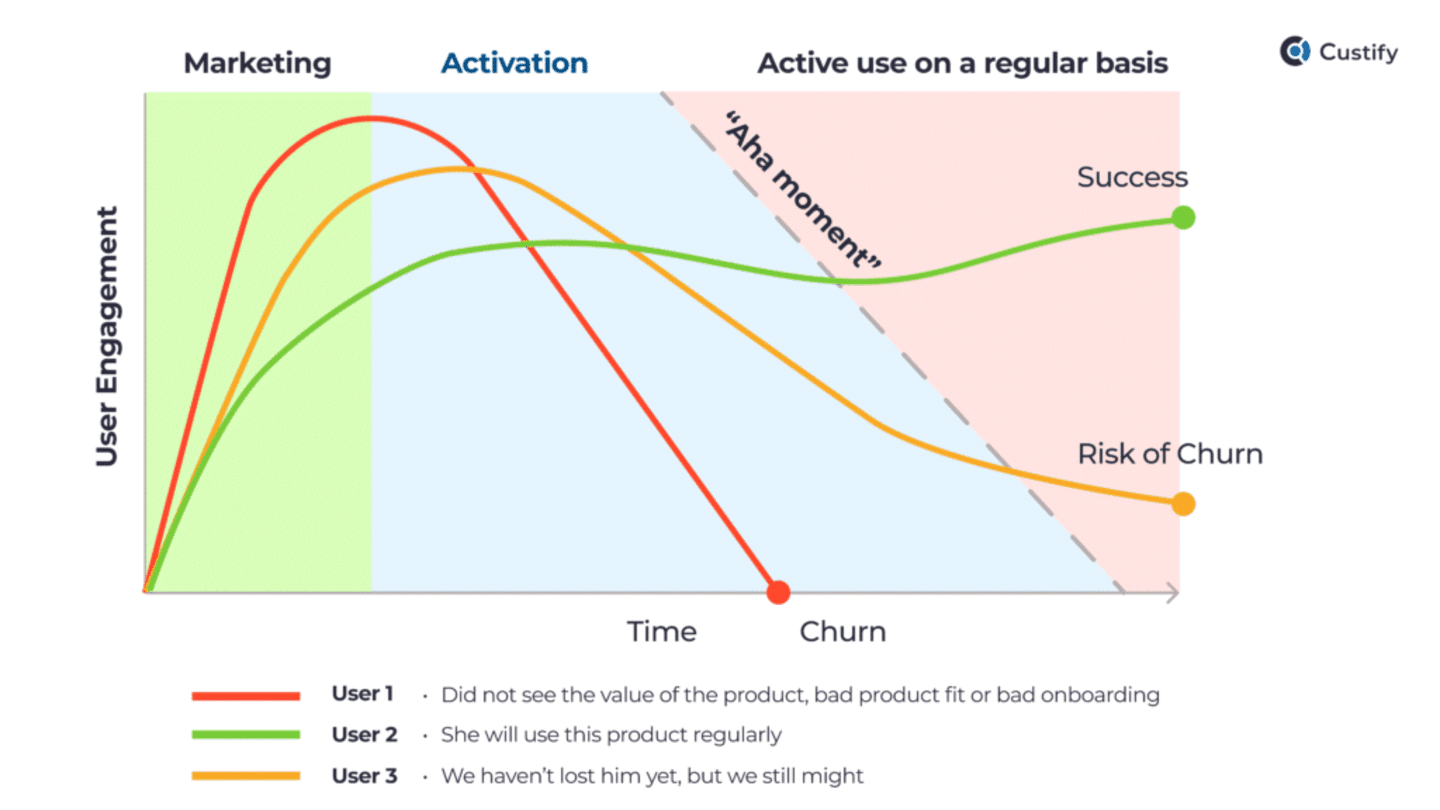
Time to value (TTV) is one of the most important metrics in customer onboarding. It represents the time a new customer needs to learn to use your product or service well enough to get its full value. The lower your company’s average TTV, the better. A short time to value means your onboarding process works efficiently and your customers can start benefiting from their products quickly. A longer time to value usually indicates that some part of your onboarding process could work more efficiently.
2. Support tickets
The number of support tickets your customer service team receives can also be a valuable indicator of how successful your onboarding is. If you receive a lot of tickets, which customers usually send when they can’t find the information they need in the available documents, it’s a sign your resources fall short.
3. Customer Lifetime Value
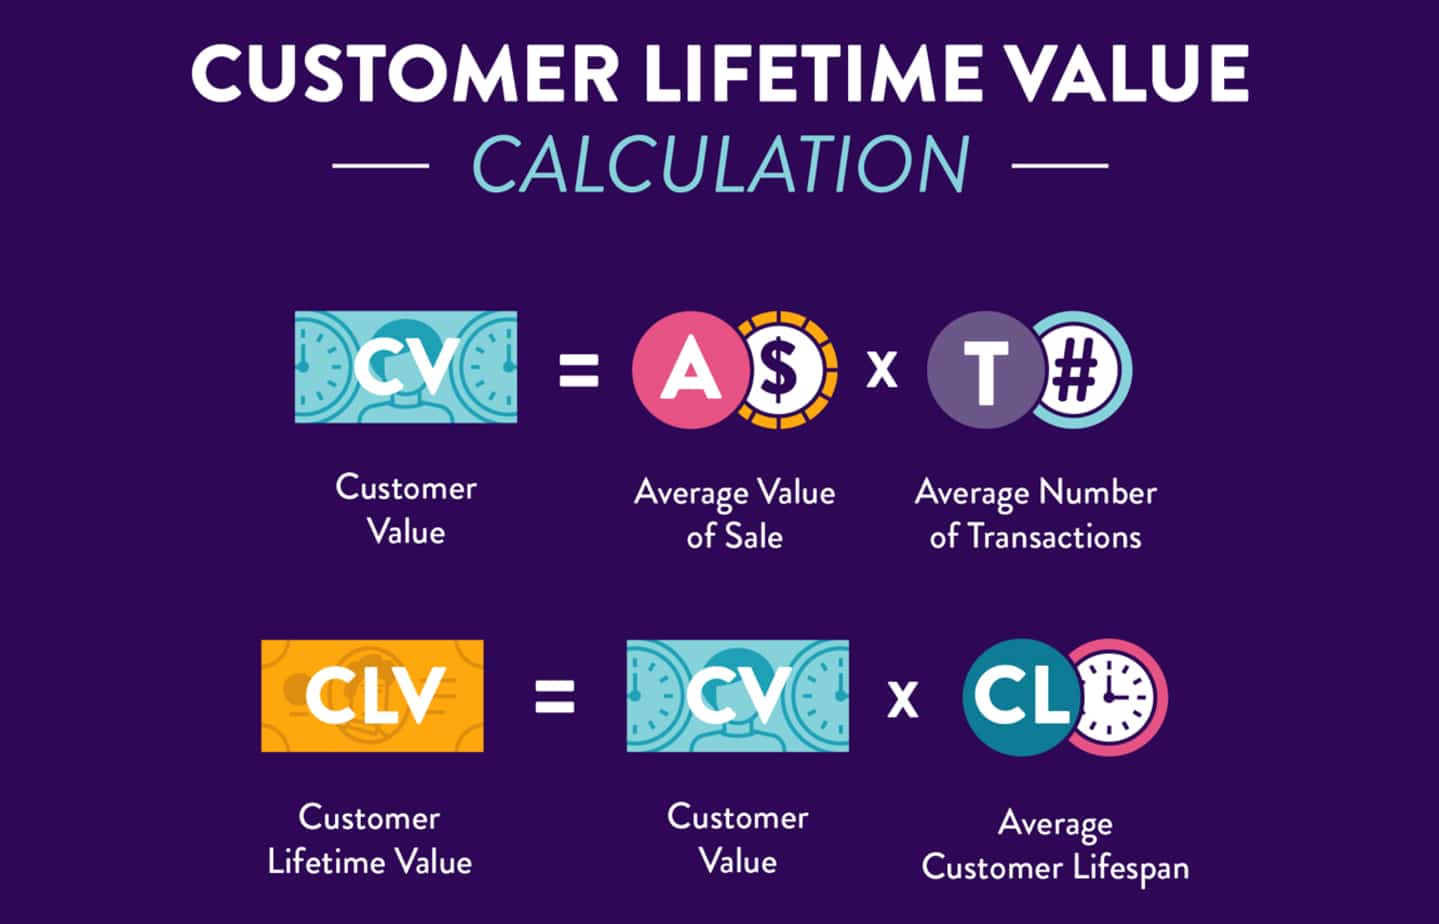
Customer Lifetime Value (CLV) is another useful onboarding metric. It estimates the amount a customer will spend with your company between the moment they sign up and the moment they end their relationship with your company. Very often, the higher the value, the better the experience.
It’s a fairly useful metric for identifying the improvements to make to your onboarding program.
4. Customer Engagement
Customer engagement is a metric that measures how your customers interact with your onboarding resources. If they show no interest in them, it may mean your welcome program isn’t set up effectively.
5. Course completion rate
The course completion rate tells you how many of your customers stay interested in your welcome materials all the way to the end. If few customers finish certain sections of your onboarding process, it’s a clear sign your content is too hard, too confusing or not relevant enough.
10. Don’t push the upsell at all costs
Take the time to build a relationship with your customer before offering them anything else, don’t rush, and don’t chase the upsell at all costs.
If you want to keep your customer, you need to set up a well-defined onboarding to support the customer through discovering and using your product. So let them get comfortable with your initial product.
Work on building a relationship of trust with the customer and ask them clearly whether they are satisfied with your service, and why. It will be very useful to understand their sticking points and then offer an additional deal that meets their needs.
Also worth reading7 concrete actions to measure customer satisfaction
Onboarding examples we like
Slack
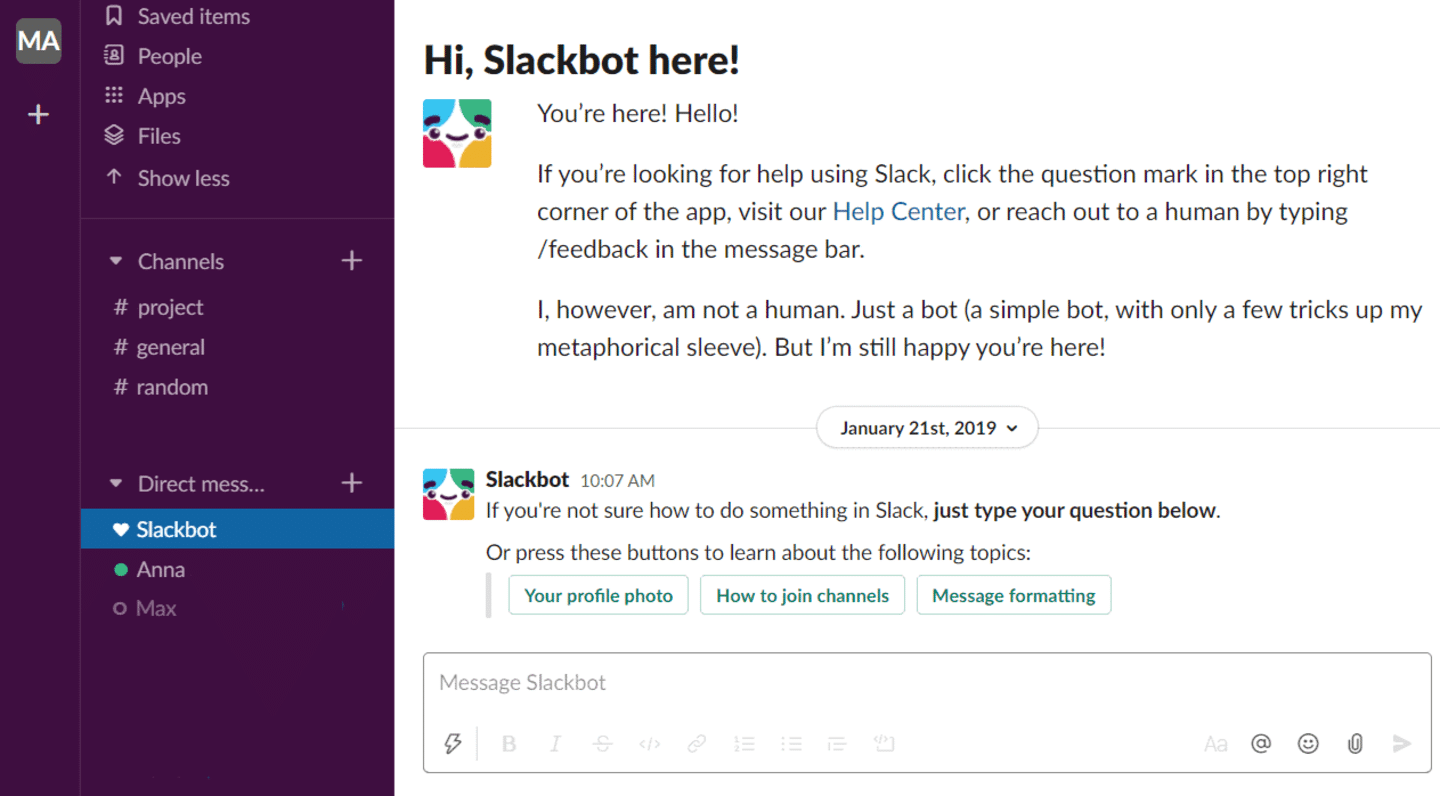
Slack offers a great onboarding. Whether you create your own workspace or are invited to join one, you’ll always have a Slackbot by your side that walks you through the basic signup steps and gives plenty of tips on creating a new channel, sending a message and adding people to channels.
Above all, Slack lets you leave the onboarding tutorial at any time if you want, while still using all its features.
Also worth readingTop 15 best collaboration platforms
Trello
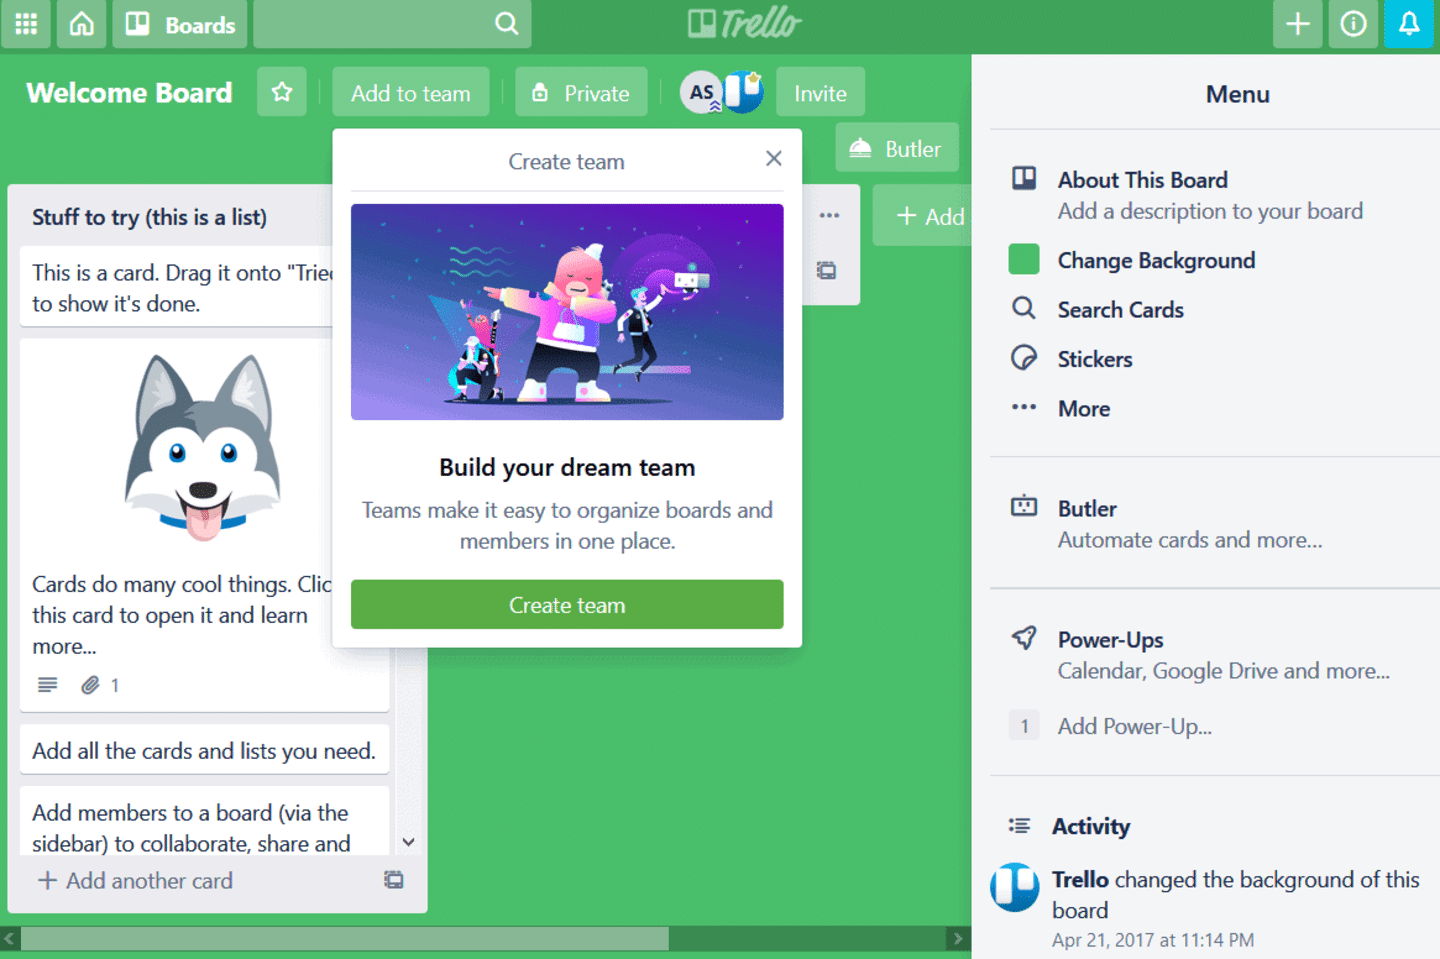
Trello, like Slack, also makes heavy use of empty states. As soon as you log in and open the welcome board, the app introduces all the main features, explaining what you can do to get started.
You immediately see how the process is organized, Trello’s main unit, the card, and what you can do with it. The welcome board also gives a full overview of the available features, showing the board menu and a pop-up inviting you to create a team.
Also worth readingOur Trello review: the Kanban tool par excellence
Chanty
Chanty is a chat tool with a rather friendly customer welcome flow. Everything you type while setting up your account immediately appears in the matching fields of the user interface, and your profile is built as you type.
The tool uses an onboarding assistant bot, Rufus, that points out all the product’s most important features. Rufus walks you through every button on the chat screen and explains what each one does.
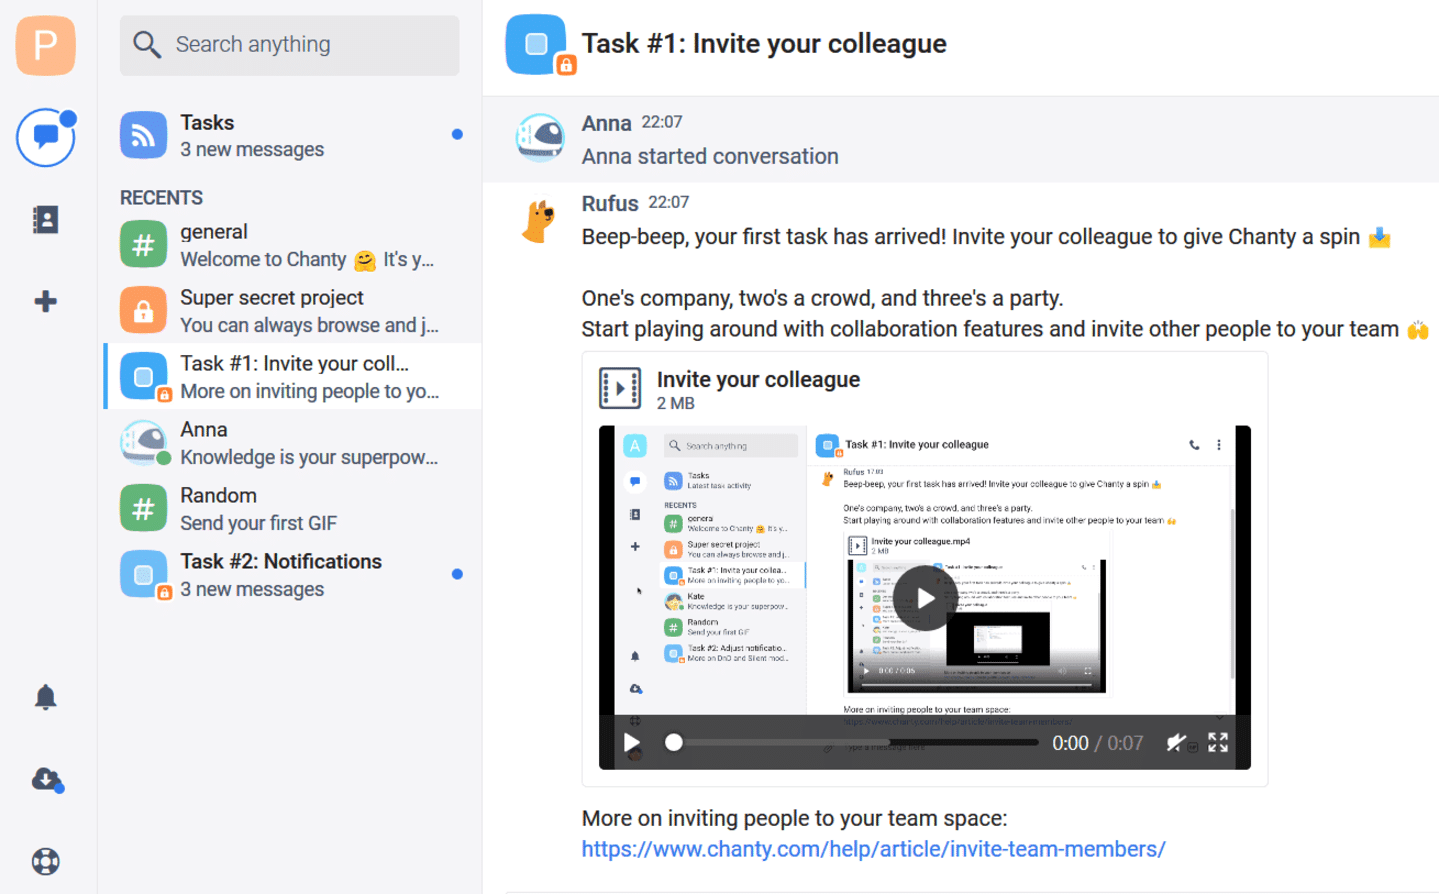
One of the strengths of Chanty’s onboarding is that it includes a real hands-on exercise. After a quick tour, Rufus creates your very first task: Invite your colleague. This task comes with a short video tutorial and a link to the knowledge base, which gives more detail on the topic. You not only get a basic grasp of the task concept, you also start building your team on Chanty.
Go furtherFeel free to check out our other articles on onboarding or related topics!
The questions we get over and over.
What are the stages of customer onboarding?
Four main stages: the kickoff meeting for introductions and goals, the "aha moment" when the customer sees their first result, a 30-day check-in to remove blockers and a 90-day check-in to validate the relevance of the solution.
What types of customer onboarding are there?
Self-service onboarding, for a simple product with a getting-started guide; low-touch onboarding, with guided tours and tutorials, as at Zoom, Canva or Mailchimp; and high-touch onboarding, personalized, for complex products.
Which KPIs should you track to measure customer onboarding?
Time to value, the number of support tickets, Customer Lifetime Value, customer engagement with onboarding resources and course completion rate.
What is time to value?
It's the time a new customer needs to learn to use the product well enough to get its full value. The shorter it is, the better the onboarding works.
Should you offer upsell during onboarding?
No. At the 30- and 90-day check-ins, the goal is still the value drawn from the first purchase. Build a relationship of trust first and ask the customer whether they are satisfied, so you can then offer a deal that meets their needs.


What the community says.